Form Elements
On this page:
Forms are a great way to collect information and/or make website users easily contact your business.
Some types of forms that you could integrate into your website include contact forms, surveys and polls, feedback, signup forms and more!
Limecube allows you to effortlessly create a form with multiple form fields to easily collect information from your website visitors.
Creating Forms
To add a Form to your page:
- Make sure you are on the page you wish to add the form to.
- Click on the ‘+Add Element’ Icon on the Page's Header Bar
- Drag and Drop the Form icon onto the area of the page that you want it to appear in.
- Hover your cursor over the form and Click on the Settings Icon.
- Create a New Form
- Edit Form Fields using the pen icon.
- Add new form fields using the ‘+ Add New’ Button
- Click on the settings tab to edit form settings for submissions.
- Click on the grid tab and use drag and drop to edit the structure of your form.
- Click 'Apply'
You have now added a form to your page.
Creating/managing form fields
Form field options
| Option | Description |
| Text | This is a free text field |
| Checkbox | To add a selectable checkbox |
| Agree to terms | Choose field type 'checkbox, then click the 'Accept terms' checkbox. This then gives you the ability to get users to agree to the terms of submitting your form. |
| Textarea | To add a large description box for free text such as 'Notes'. |
| Select | Allows multiple options to be added for users filling out a form to choose from. |
| File |
Allows you to upload a file. File extensions allowed are: File Size limits
Files that are uploaded through a form can be found in the email, and in your file manager. For privacy and security purposes, if any files contain sensitive or private information, we recommend always downloading and removing them from your file manager.
|
| Radio button | To add a radio button to provide options a user must choose from, e.g. contact us morning or afternoon. |
| Heading Separator | Allows you to insert a heading into part of the form to break the form up into sections. |
This help video below shows you how to create and control the fields in the form plugin. This example shows:
- how to create a drop down of options
- make them required fields for the user filling out the form
- how to change the position of the new option.
This method can be applied to any field type.

Setting your email address
The email address the form sends to automatically pulls from the email address in your profile.
To change where your form sends the email:
- Go to form settings (click the icon to edit the form)
- Click the settings icon on the tab at the top right
- You will see the screen in the screenshot below.
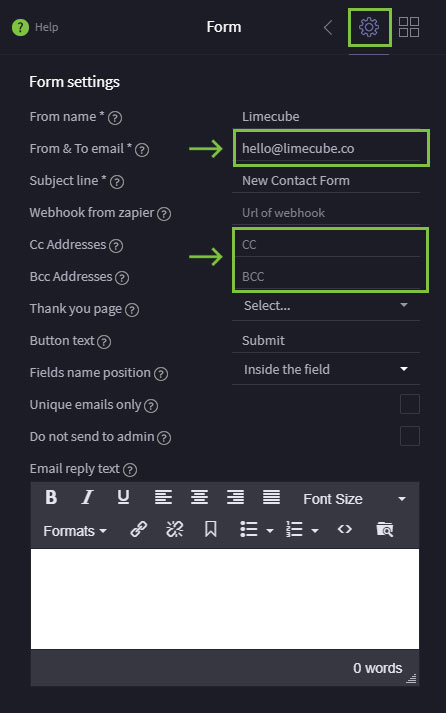
- Look for the 'From & To Email' field and place your new email address there
- you can also add additional cc and bcc addresses in. These are as indicated in the screenshot below and work the same way as cc and bcc in a normal email
- you can also add additional cc and bcc addresses in. These are as indicated in the screenshot below and work the same way as cc and bcc in a normal email
IMPORTANT: make sure you test the form immediately to make sure you receiving the email to the new email address.
Setting a thank you page
The thank you page is the page a user is redirected to once they have submitted a form on your website. Why do you need to set this?
- It makes it clear to your user that they have successfully submitted the form and you will receive it.
- It allows you to use the 'thank you' page as a goal in Google Analytics, and thereby tracking how well the forms are doing on your website.
Once you have created the thank you page, go to your form settings and look for the thank you page settings as seen in the screenshot below to set that page as the forms thank you page.

What should be on your thank you page?
Having a message as simple as:
Success!

Thanks for your enquiry! Someone will be in contact with you in the next 48 hours.
Integrations
Integration with Google Sheets
You can also integrate your forms to push to Google Sheets. More information can be found here.
Integration with Zapier
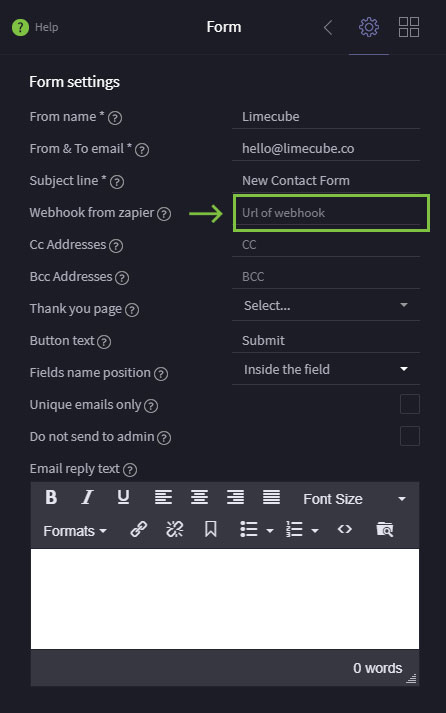
A webhook is for transferring data from this web form through to any integrations you have in Zapier. The easiest way to think of webhooks is as notifications. At their simplest, they carry a payload of data which is usually a single record that has been created or modified, although some apps will send along multiple records at once in the name of efficiency.
Using a webhook, you can push your form data to Zapier. Click here to find out how to use webhooks on Zapier.
Zapier is used for automating integration of your data, with many other web applications around the web. What is Zapier? Zapier is one of the most used applications in the world. In the case of Limecube, this means once you have set up this integration, it integrates your form data with other apps/software you are using. Find out more about Zapier here.
Connecting your form to Mailchimp
- Mailchimp allows you to sending emails from free to a paid plan depending on the number of subscribers you have
- For Limecube users on the business plan, there is a feature for Google Sheets integration which stores all email subscriptions in one place.
- Google Sheets can be connected to Mailchimp to feed to Mailchimp automatically through a platform called Zapier.
- This help article shows you how: https://mailchimp.com/integrations/zapier/.
Creating a subscription form
If you are looking to create a subscription form on your website or specifically the blog, take a look at this help video below.
In this example as we have used a blog layout. Placing the subscription form in the right column, automatically inserts the form to each blog posts' right column.
You may also be interested in linking this form to Google Sheets to keep all records in one central place. Click here to find out how.
Form spam protection
There are 2 options to help you combat spam through forms on your site:
- reCAPTCHA. Find out how to protect your site against form spam by clicking here.
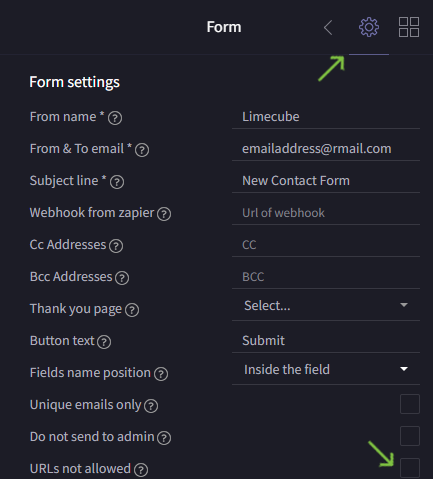
- Not allowing URLs in descriptions. For most businesses, a URL will not be inserted as part of a legitimate enquiry, and only spammers do this in a high percentage of spam. This will significantly reduce that type of spam.
- For this feature: open your form settings, and select the 'URLs not allowed'
Can't find the answer you are looking for?
Try using searching below: