Image Element
On this page:
Use the image element to add images to pages or blog posts. The image element is used for single images.
While there are multiple different ways you can add images into Limecube, the advantages of the image element are:
- Better control over the image through sizing, cropping, image position
- Optimisation of the image file size - Limecube automatically optimises the image to a webp next gen image format which is considered best practice these days.
- Adding animation individual to the image
- Being able to style the corners of the image simply and easily to create interesting shapes for your images without needing separate photo editing software.
Image resizing mode
There are 3 image sizing modes you can choose from, depending on what best suits your needs:
1. Default
The default image setting keeps your images in its original proportions, and is set to fit the maximum width of the section column it is placed within.
2. Shrinking with dynamic height
The image is responsive to the screen width, and the image frame will shrink proportionally by the frame’s proportion. The image frame is the section column your image sits inside of.
Desktop behaviour
- The image frame will fit into 100% width to the area it is placed.
- The height set by the height slider or value field.
Mobile behaviour
- Once the toggle is set to ‘on’, you have the option to set a separate mobile height for the frame.
- The image frame will fit into 100% width to the area it is placed.
- It works the same as desktop when ‘Different on mobile’ toggle is ‘off’.
3. Cropping with fixed height
- The image is responsive to the section width. The image itself will not shrink and instead crops
- the image frame will stay at the set height, and
- the frame width will always be 100% of the area it is within.
- it will crop the image based on the centre point you set when positioning the image, or based on the original placement where you have not changed the position.
Desktop behaviour
- The image frame will fit into 100% width of the area it is placed.
- The height is set by the height slider or value field.
Mobile behaviour
- Once the toggle is set to ‘on’, you have the option to set a separate mobile height for the frame.
- The image frame will fit into 100% width of the area it is placed.
- It works the same as desktop when ‘Different on mobile’ toggle is ‘off’.
Adding an image element
- Select the page that you’d like to add the image to.
- Click on the ‘+Add Element’ Icon on the Page's Header Bar
- Drag and Drop the Image element to the area of the page required.
- Use different settings to get your image perfect (these are covered in more detail in the section below)
- Adjusting your image according to the device (Desktop/Mobile) view.
- Click 'Apply'
This help video walks you through these steps.

Adding or replacing an image
If your image element is already on the page, and you want to add or replace an image, follow these steps:
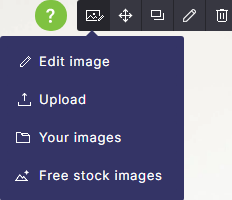
- Hover over the image
- Hover over the function icon on the left

- Choose from one of the options to add an image.
Each option:
- Edit image: Opens an image editor to modify your image
- Upload: Allows you to upload an image directly from your computer
- Your images: Opens the file manager and 'your images' tab to select from an existing image in your library.
- Free stock images: Opens the file manager and 'Free images' tab to find a free stock image for you to use.
Image properties
| Image height |
This controls through a live view of the image height. You can either use the slider to visually see what works for you or if you know the fixed height, type the value in you want. |
| Hover effect | This setting is an on/off option. Turning this on gives the image a subtle zooming-in effect on hover. This is separate from the animation below, and both can be used at the same time. |
| Rounded corners | Border radius is for giving rounded corners to the image. If your image is perfectly square, moving the border-radius all the way to the end can perfectly round your image. |
| Adjust individual corners | This feature allows you to adjust all 4 corners individually, allowing for some really interesting and classy-looking image styles. |
| Animation | Animation provides you with the ability to add some nice animations to your images which show on scrolling to that image on the page. The animation only appears once on scroll and does not repeat. |
| Mobile options |
Off - when it is turned off, the mobile version will work exactly as it does on desktop On - When it is turned on, you have the ability to change the height and reposition/crop the image to suit a mobile device view. |
| Alt text |
This is the text that only appears in the source code and tells screen readers and search engines what the image is about. |
| Link | Link your image to either an internal page (the first drop-down), or an external page using the next URL field. |
| Paddings | This feature allows you to add spacing around your image, for times when you may need some extra adjustment for your page design. This setting is available for desktop and mobile. |
Extra Image
Choose either 'image' or 'shape' from the first option: 'Select type'.
Image options
| Label | Description |
| Browse image | Upload or select an image to display. You can change or edit it after selection. |
| Image width | Sets the width of the image as a percentage of its container. |
| Mobile image width | Sets the image width specifically for mobile view. |
| Alignment | Determines the image’s alignment within its container (e.g., Top Left). |
| Horizontal offset | Shifts the image horizontally from its aligned position, in %. |
| Vertical offset | Shifts the image vertically from its aligned position, in %. |
| Rotation | Rotates the image by a specified number of degrees. |
| Scroll effect | Applies a scroll-based animation effect (e.g., parallax). |
| Placement | Determines layering, e.g., whether this image appears over or under another image. |
| Hide on mobile | Toggles visibility of the image on mobile devices. |
| Rounded corners | Sets the radius for rounding the corners of the image. |
| Adjust each corner | Allows setting a different corner radius for each corner individually. |
| Mobile options: Rounded corners | Defines corner rounding specifically for mobile view. |
| Mobile options: Adjust each corner | Allows independent corner radius settings for mobile. |
Shape options
| Label | Description |
|---|---|
| Select shape | Choose a predefined shape (e.g., circle, square). |
| Shape colour | Selects the fill colour for the shape. |
| Shape width | Sets the width of the shape as a percentage of its container. |
| Mobile shape width | Sets the shape width specifically for mobile view. |
| Alignment | Determines the shape’s alignment within its container (e.g., Top Left). |
| Horizontal offset | Shifts the shape horizontally from its aligned position, in %. |
| Vertical offset | Shifts the shape vertically from its aligned position, in %. |
| Rotation | Rotates the shape by a specified number of degrees. |
| Scroll effect | Applies a scroll-based animation effect (e.g., parallax). |
| Placement | Determines layering, e.g., whether this shape appears over or under an image. |
| Hide on mobile | Toggles visibility of the shape on mobile devices. |
Mobile Options
This is found under the tab with the mobile icon at the top.
| Mobile options |
Off - when it is turned off, the mobile version will work exactly as it does on desktop On - When it is turned on, you have the ability to change the height and reposition/crop the image to suit a mobile device view. |
Image style examples
By using the 'Adjust individual corners' setting on images, this allows you to add some pop to your images, and improve the design of your page. Here are 6 examples where we have used this feature.

Setting: Adjust individual corners
Corner settings:
| Top left | 20px |
| Top right | 20px |
| Bottom left | 200px |
| Bottom right | 20px |

Setting: 'Rounded corners' only
800px

Setting: Adjust individual corners
Corner settings:
| Top left | 300px |
| Top right | 300px |
| Bottom left | 0px |
| Bottom right | 0px |

Setting: Adjust individual corners
Corner settings:
| Top left | 0px |
| Top right | 300px |
| Bottom left | 300px |
| Bottom right | 0px |

Setting: 'Rounded corners' only
800px
This image needs to be in square proportions to make it a perfect circle.

Setting: Adjust individual corners
Corner settings:
| Top left | 800px |
| Top right | 800px |
| Bottom left | 0px |
| Bottom right | 800px |
Deleting the image element
- Make sure you are on the page you wish to delete the image from.
- Hover your mouse on top of the image.
- Select the bin icon to delete the image from your page.
You have now deleted the image from your page.
Can't find the answer you are looking for?
Try using searching below:
