Social Logins for blog comments
On this page:
You can set up either of these 2 options below, or both. Both give your users more flexibility as while most people have Google and Facebook, certainly not everyone does.
Google Login setup
Before You Start
You will need the following:
- A Google account
- Be logged into the Google account you want associated with this social login.
- Your Limecube settings open ready to paste these details in. Any reference below to placing these details in settings should be applied here. These settings can be found at:
- Limecube Settings go to: More > Administration > Settings > Blog > Google Login
Step 1 - Create project
- If it is the first time using this function, you will need to first create a project. Visit the Google Cloud Platform Console.
- Give your project a name, e.g. ‘Limecube login’

Step 2 - Configure the consent screen
- On the left sidebar click ‘OAuth consent screen’
- On the right side main panel ‘User Type’, choose ‘External’ and click Create to go to the next screen
- Select the Web application application type.
- In the Application name field give your ‘application name’ a name that makes sense. E.g. ‘Limecube social login’
- Scroll down to ‘Authorized domains, and place your domain name into this field.
- If you wish to test the login button before you make your site live by connecting your domain name, add your domain as well as: limecube.co’. (So you will then have 2 entries for ‘Authorized domains.)
- Add your Application Privacy Policy link
- Add your Application Terms of Service link (Optional)
- Click save
Step 3 - Create credentials
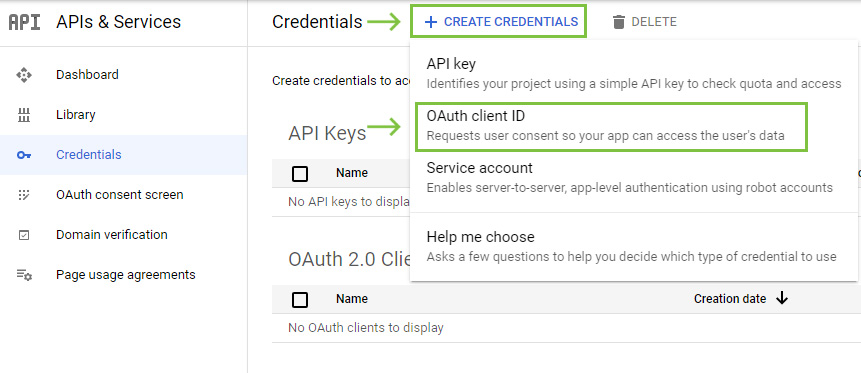
- Go to ‘Credentials’ in the left sidebar.
- Click ‘Create credentials’ at the top of the page

- Choose ‘OAuth client ID’.
- Application type: Select ‘Web application’
- Name your ‘OAuth 2.0 client’
- Add your domain name to ‘Authorized JavaScript origins’
- Click Create
- You should at this step have a popup that shows your: ‘Client ID’ and ‘Client secret’. Copy and paste these credentials to your Limecube settings. To find these settings go to:
- Limecube Settings go to: More > Settings > Blog > Google Login
- Next click ‘Ok’
Facebook Login setup
Before You Start
You will need the following:
- A personal Facebook account
- A Facebook Developer Account.
- A registered Facebook App with Basic Settings configured:
- Your Limecube settings open ready to paste these details in. Any reference below to placing these details in settings should be applied here. These settings can be found at:
- Limecube Settings go to: More > Administration > Settings > Blog > Facebook Login
Step 1 - Create app
- Go to: https://developers.facebook.com/apps/, and click on ‘Get Started’.
- If this is not your first time setting up the Facebook Developer app, you can skip to step 3. If this is the first time setting up the Facebook Developer account, it will prompt you to set up the developers account first. Simply follow the registration steps to create your account. Then on the last screen, click the ‘Create First App’ button

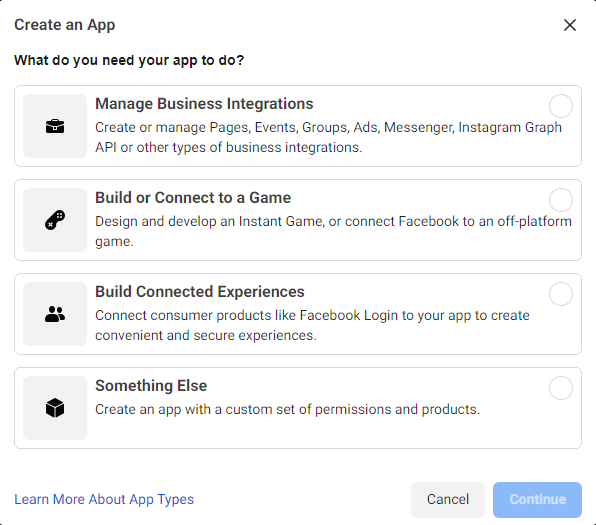
- If you already had a Facebook Developer account and had setup Facebook apps before, visit ‘My Apps’ from the top of the screen after login, then click ‘Create App’ button in the top right.
- On the next screen, with the question ‘What do you need your app to do?’, choose ‘Build Connected Experiences’.

- Enter your app display name, e.g. ‘Limecube Login’
Step 2 - Add Products to Your App
- Once the app has been created, you will need to add a product to your app on the next screen.
- Choose the ‘Facebook Login’ card by clicking ‘Set up

- On the next screen, choose ‘WWW’ (web).
- Enter your site URL and click save.
- Your app has already been created by now, you.do not need to click on the continue button to go through the other steps on this screen. Please continue with Step 3 below
Step 3 - Facebook app secret
- Click ‘Settings > Basic’ in the left side menu
- On the top row you’ll see the field for:
- ‘App ID’
- ‘App secret’ - Click show
- Copy and paste these credentials to your Limecube settings. To find these settings go to:
- Limecube Settings go to: More > Settings > Blog > Facebook Login
- Copy and paste the App ID to Facebook application id, and then copy and paste the App Secret to Facebook app secret. Then click Save all button on top:
- Come back to the same screen on Facebook, please also fill in your websites:
- App domain
- Privacy Policy URL
- Terms of Service URL
- User Data Deletion (Data Deletion Callback URL)
- Then click Save Changes.
- One last step, click on the toggle next to the label ‘in development’ on the top of the screen to switch your app to live. If you do not your login will not fully work.
- It will required you to choose a category in the popup, then click ‘Switch mode’
- Now your app is live, and you should be able to use Facebook login on your blog comments.

Testing
It is really important once you set everything up you test to make sure everything is working. The things you need to test for are:
- Each login button you setup works, and logs you in without any errors. If you encounter any errors, these will be due to the settings on either Google or Facebook
- A comment can be submitted and appears on the blog post (or shows as admin approval required and sits in your admin screen waiting for approval
Can't find the answer you are looking for?
Try using searching below: