Adding & Duplicating pages
On this page:
This guide will walk you through the steps to add new pages to your Limecube site and how to duplicate existing pages, as well as how to publish your page. Following these instructions will help you expand your website efficiently and maintain consistency across your content.
Finding page
All your pages are accessible from the top left corner 'Page' next to the 'Add element' button. Clicking that button will reveal all your site pages.
![]()
Pages overview
Creating pages on your site requires thoughtful planning of your top menu and sub-pages. A well-organised menu and page structure enhances the user experience by making site navigation intuitive.
When adding pages to the page panel, their placement will determine your site's structure. However, these pages will not appear in the menu unless you publish them.
Follow the instructions below to learn how to:
- Add top-level pages
- Add sub-pages
And while there's no functional difference between your home page and other pages, a home page is essential for your site's hierarchy and serves as an introduction to your website. It's often the most visited page by both users and search engines. Home pages a.k.a. cover pages are bold landing pages used to make an enticing introduction to your website. This is also the most visited page on the website, by both users and search engines.
Adding pages
Tips:
- Test page load speeds; ideal load time is around 3 seconds or less. Heavy images or videos can slow this down. Learn more about page speeds.
- Deactivating the home page deactivates the whole site, resulting in a 404 error.
To Add a Page:
1. Go to ‘Page Editor’ on the Header and
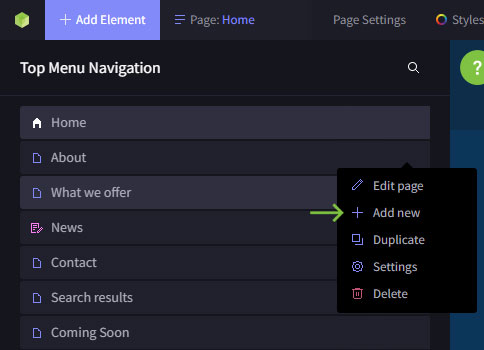
- Right-click on ‘Home’ to create a top-level page, and select 'Add new'
- Click the 'Add new' button at the bottom of the left-hand column.

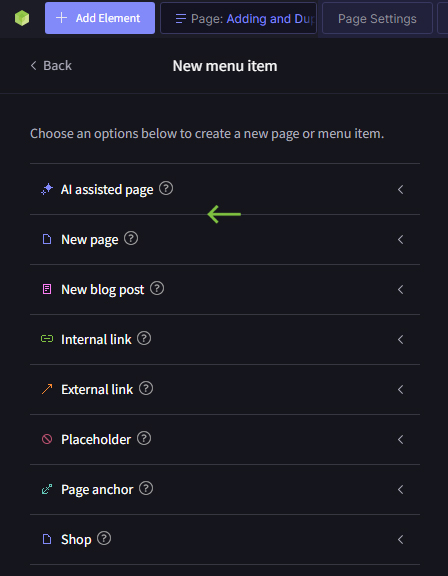
2. Choose from Options:
- 'AI Assisted Page': AI creates the page for you.
- 'New page': Create a new page to populate yourself.
Adding a sub-page
To create a sub-page under an existing page, follow these steps:
- Go to ‘Page Editor’ on the Header.
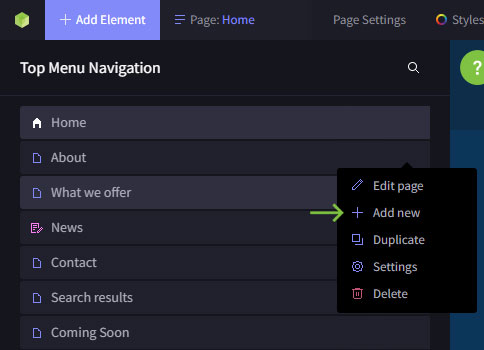
- Right-Click on the Parent Page: Select the page under which you want to create a sub-page.
- Select ‘Add’: Choose the option to add a new sub-page.
- Enter Page Details and Select a Layout: Provide the necessary details and choose a layout for the sub-page.
- Apply: Click ‘Apply’ to finalise.
- Follow Remaining Steps: Complete the process by publishing and saving as you would for a new page.
- Go to ‘Page Editor’ on the Header.
- Right-Click or Double-Click: Right-click on the page you want to edit or double-click the menu item.
- Select ‘Edit’: Choose the edit option to make changes to your page.
- Save Changes: Remember to click 'Save' once you have finished editing.
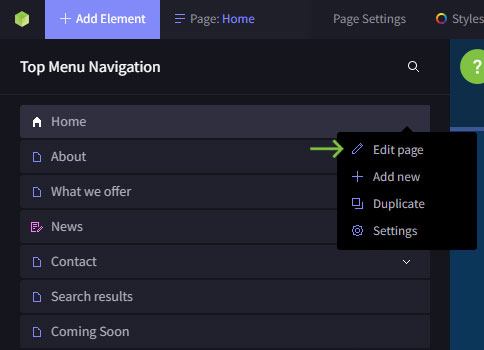
To learn about editing specific elements on the page, click here.
The help video below shows you how to find and edit a page:
Help videos
1. Adding a page: watch the help video below to see how to add a page:

1. Editing a page: watch the help video below to see how to edit a page:

AI Assisted and standard pages
AI Assisted pages
Opt for the AI-assisted page for quick AI generation of your layout and text.
- Free Trial: Includes 2 free pages. Additional pages require purchasing AI credits.
- Business Plan Subscribers: Enjoy unlimited free page generations.
Steps:
- Fill in the necessary fields with detailed information.
The quality of your input directly affects the quality of the output.
Remember, the more detailed and accurate your input, the better the AI can create your page.
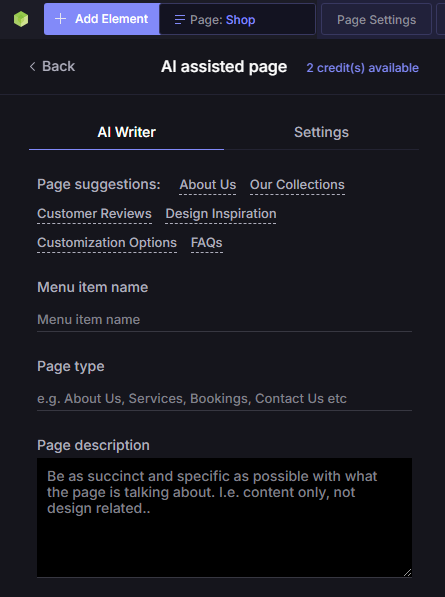
| Item | Details |
| Page suggestions | These are AI driven suggestions based on the details you entered when you signed up. Selecting one of these will fill out the details below it. |
| Menu item name | This is your page name, and when published appears on your navigation menu. |
| Page type | This tells the AI what type of page you are creating. E.g to sell products or services, events. This context helps AI give you the right style of page. |
| Page description | This gives the AI more information about the details the page should contain. Avoid adding colours or layout/design information, as the AI already takes care of that, and it may confuse the result. |
| Settings tab | The settings tab contains the information you entered into your site when signing up, and the AI uses this information in part, as part of your page creation. This can be edited if you feel what you entered on signup was not fully correct. |
Normal pages
A normal page provides an empty starting point for you to build a page exactly as you envision it. Here’s how to proceed:
- Enter Page Details: Provide the necessary details for your new page.
- Select a Layout: Choose a layout as a starting point for your page design. Think of it as a flexible template that you can modify as needed. Learn more about modifying and creating different page structures.
- Duplicate for Consistency: If you want your new page to match the layout of existing pages, consider duplicating a page instead.
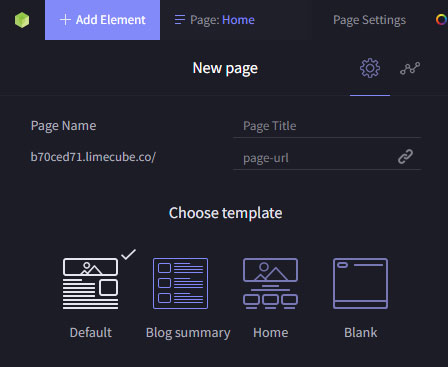
Note: The page URL field will automatically populate based on the page name, but you can change it manually if desired.
Once you are done creating the new page:
- Click 'Apply': Finalise the page creation.
- Publish Options:
- 'Publish': Make the page visible on the front end.
- 'Show On Menu': Add the page to your site menu.
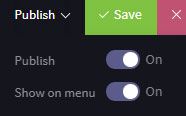
- Click 'Save': Save your changes.
This page will now appear on the site menu.
Making a Page Active

When you first create a page, it will not be active, allowing you to work on it privately.
To make the page active for public viewing:
- Top Admin Bar: Hover over 'Publish' in the top right corner.
- Turn 'Publish' On: Activate the page for public view. If not activated, it will show a 404 error.
Or:
- In the left panel pages menu, right click on the page you want to make active and select 'Publish'
To make a page inactive:
- Repeat Steps Above: Hover over 'Publish' and turn it 'Off'. This will result in a 404 error for anyone trying to view the page.
Publishing a page to the navigation menu in the header

Simply making a page active won't display it in the top navigation menu. Here's how to show a page on the menu:
- Top Admin Bar: Hover over 'Publish' in the top right corner.
- Turn 'Show on Menu' On: Activating this will display the page on the navigation menu. If not activated, the page will function but not appear in the menu.
Or:
In the left panel pages menu, right click on the page you want to make active and select 'Show on menu'
Publishing a 'Placeholder' menu item
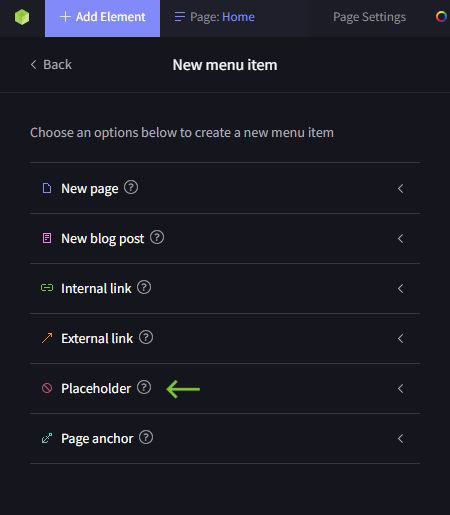
Placeholder menu items don't contain a page, so the process to publish them to the menu is slightly different:
- Hover Over the 3 Dots: On the placeholder menu item.
- Click 'Show on Menu': This will publish your placeholder to the navigation menu.
Duplicating a Page
Advantages of Duplicating a Page:
Duplicating a page is beneficial when multiple pages on your site follow the same structure but have different content and images. It saves considerable time in creating new pages.
Steps to Duplicate a Page or Blog Post:
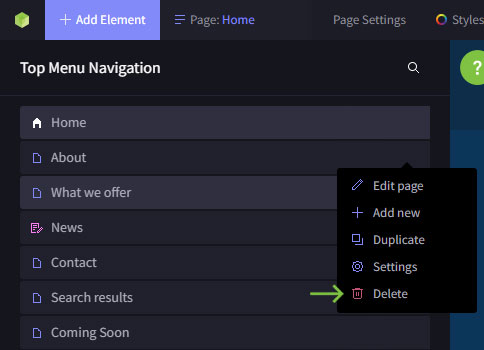
- Right-Click: On the page you wish to duplicate in your page menu.
- Select ‘Duplicate’: Click on the duplicate option.
- Edit the New Page: The duplicated page will load for you to start editing.
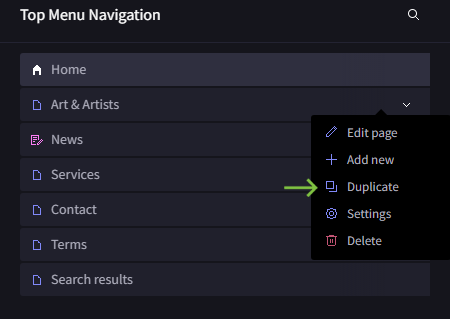
Watch the help video to see how to duplicate a page and blog post for reuse on your Limecube website.

Page/menu types
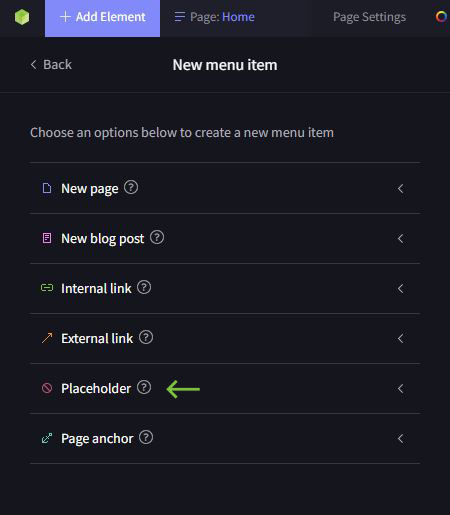
| Type | Purpose |
| New page | For adding a new page to your site. Click here to learn more. |
| New blog post | For adding a new blog post to your site. Click here to learn more. |
| Internal link | This allows you to create a menu item, that links to an existing page. This is useful for sites that want to have the same page appear in multiple places on the menu. |
| External link | This allows you to create a menu item, that links to an external website. |
| Placeholder | A placeholder item is for adding a new menu item, without any content in it. E.g. This can be quite useful for a services section on your menu, where the top level main service menu item serves purely as a placeholder, with sub-pages appearing under it. |
| Page anchor | This is for creating a menu item that links to a specific part of the same page. This is really only useful for one page websites that have multiple items on a menu, that scroll the user to specific parts of your page. |
| Shop | Only available on a trial or business plan, the shop provides you the ability to sell online. This can only be selected once per site. Click here to learn more. |
Set as Homepage function
The "Set as Homepage" feature allows you to set a different page as your homepage without needing to work on your live home page. This lets you edit and test layouts freely before setting them as your home page.
Steps to Set a Page as Homepage:
- Find the Page in the pages panel:
- Hover over the page you want to set as the homepage.
- Click on the three dots on the right.
- Set as Homepage:
- Select "Set as Homepage" from the dropdown menu.
- Note: If the page is inactive, it will become active and replace the current homepage.
- Current Homepage:
- A copy of the current homepage will be created and placed just underneath.
- Make the previous homepage inactive and relabel the new home page to "Home" if needed.
This feature helps maintain a seamless user experience while you make changes.
404 Pages
If you are seeing a 404 page when linking to an internal page, it is usually due to one of these two reasons:
- You have created the page, but not yet 'published' it (made it active). By default, pages are not active, as this gives you time to work on them before anyone else can see them.
- There is an error in the link path. In this case, check the page settings URL field of the page you are trying to link to, to make sure it matches what you are trying to link to.
Customisation:
Currently, 404 pages are system-generated and cannot be configured within your Limecube interface.
Best Practices
Organising the Menu for Better User Experience:
- Structure your menu logically, grouping related pages under relevant categories.
- Keep the top-level menu concise to avoid overwhelming visitors.
Using Consistent Naming Conventions for Pages:
- Use clear and descriptive names for pages to make navigation intuitive.
- Maintain a consistent naming pattern for ease of management and SEO benefits.
Regularly Testing and Optimising Page Load Speeds:
- Test your pages using speed testing tools to ensure they load within 3 seconds.
- Optimise images and videos to reduce load times and enhance user experience.
By following these best practices, you can create a user-friendly, well-organised, and efficient website.
Tags: add page, create page, create a page, creating a page, tabs, page copy, copying a page, delete page, deleting a page, add pages, edit pages
Can't find the answer you are looking for?
Try using searching below:
