Banner/Sliders
On this page:
- How to add a Banner/Slider
- How to edit a banner/slider
- Banner Properties
- Adding a video
- Banner Sizes Explained
- How to delete a Banner from a page
- Making your banner full screen
- Setting Mobile Height
- Settings
- Slider Functions
- Styling your banners
- Best Practices for Banners
- Common Issues and Troubleshooting
- SEO Tips for Banners
Banners and Sliders (also known as Carousel images) refer to images or videos that often appear at the top, but not exclusively, of a webpage. When used effectively, banners and sliders can engage users, deliver important messages, and serve as strong conversion points.
Using this Element:
- Single Image Banner: Add a single image to create a banner.
- Single Video Banner: Add a single video to create a banner.
- Slider (Carousel): Add multiple images or videos, and it automatically becomes a slider.
How to add a Banner/Slider:
- Select the Page: Choose the page on which you’d like to add the banner or slider.
- Add Element: Click the ‘+Add Element’ icon on the page's header bar.
- Drag and Drop: Drag and drop the Banner/Slider icon onto the desired area of the page.
- Open Settings: The settings for the banner should open automatically.
- Add Media:
- Image: Select 'Add Image' to upload an image.
- Video: Select 'Add Video' to upload a video. You can choose either a YouTube or Vimeo video.
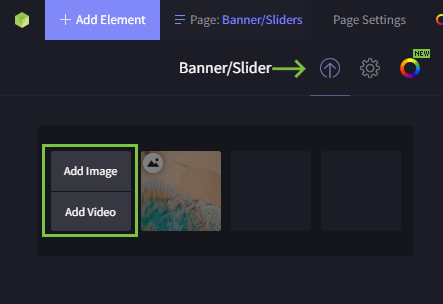
- Fill in Fields: Enter any required information to display as part of your banner or video.
- Adjust Settings: Refer to the settings tab to configure additional settings. See below for more details.
- Apply Changes: Click ‘Apply’ to immediately apply your changes to the banner or slider on your page.
- Completion: You have now added a banner or slider to your page.
Watch the help video below to see how to access and use the Banner/Slider Plugin on Limecube.

How to edit a banner/slider on your page:
- Open the Banner/Slider: Access the banner or slider you wish to edit.
- Hover and Click: Hover over the image or video thumbnail you want to edit, and click on the pen icon.
- Edit Properties: You will now see all the properties you filled out when creating the banner or slider.
- Make Changes: Make the necessary changes and click 'Apply'.

Banner properties
Banner properties are the items contained within your banner such as images and text. These properties are individual to the banner you are editing.
| Image/Video | These are the thumbnails of images or videos added to the banner/slider. |
| Change Image | Allows you to change the image you are currently editing. This option only shows when you are editing an image banner. |
| Video embed | Only shows when there is a video selected - This field is where you place the embed code taken from YouTube or Vimeo.
This option only shows when you are editing a video banner. |
| Title |
The main heading in the banner. The title is used to display a catchy headline to grab people's attention on the page. Often placed at the top, it should be written in a way that quickly engages visitors as you have a short time to capture their interest. H1, H2, H3 and 'Plain text' that display next to the title are Heading styles. They do not change the visual display of your heading, they are purely for SEO purposes. A title can be split into multiple lines by hitting the enter key to start a new line. |
| Description |
Typically short and concise, the description supports the title by offering a brief summary or key message. Banners are designed to stand out, so keeping the text succinct helps in delivering your message effectively. This is the text displayed in the banner. It will display under the title if you are using one. If you use a Heading formats in the description field, these will inherit the styles from main content styles. |
| Alignment |
This determines the position of the text and button within the banner, aligning it to the left, center, or right. Choose the alignment based on the image layout to ensure the text does not obscure important parts of the image, like people's faces. |
| Button text |
If you want to include a call-to-action button, enter the button text here. This button can guide users to another page for more information or ask them to take some other action such as call you. If you prefer not to have a button, simply leave this field empty, and no button will be displayed. |
| Button link |
This is where you specify the URL or in-page anchor point that the button will link to, directing users to further information or a different section of your site. There are 3 options:
|
| Alt text |
Provide a brief, descriptive text for the banner image to help with accessibility and SEO. Alt text is what appears in the code of the site, and in some browsers on hover of that image. It is useful for:
This option only shows when you are editing an image banner. |
| Parallax | Toggle this option to enable or disable the parallax effect, which creates a dynamic scrolling experience by moving the background image at a different speed than the foreground content. |
| Auto loops |
For video only - Turning 'Auto loops' on makes your video automatically return to the start when finished and continue playing again. This option only shows when you are editing a video banner. |
| Deactivate | Use this option to temporarily deactivate the banner without deleting it. This can be useful if you want to remove the banner from view but might use it again later. |
Adding a video
This help video shows you how to insert a YouTube video. For inserting a Vimeo video the process is the same, taking the Vimeo embed code and inserting to this same field.
Inserting a video in the embed field will strip out all video controls and YouTube/Vimeo branding to display a nice clean video.

Making your banner/slider full screen (100% height)
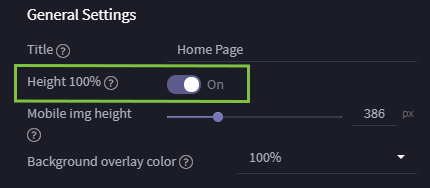
If you wish your banner/slider to take up the full screen on desktop and tablet devices:
- Open your banner
- Click the settings tab in the top right corner
- Turn 'Height 100%' to the on position.
Setting Mobile Height
Settings
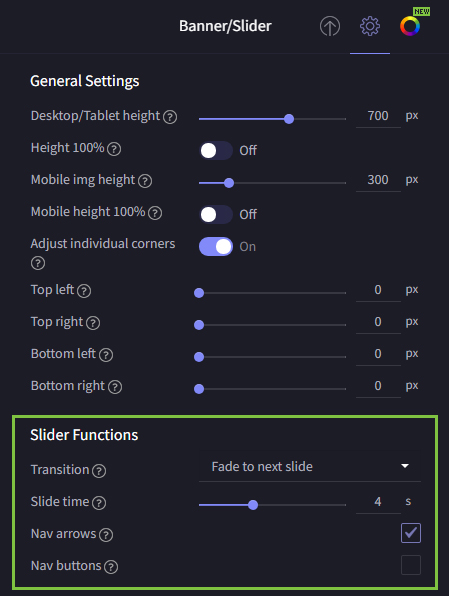
General Settings
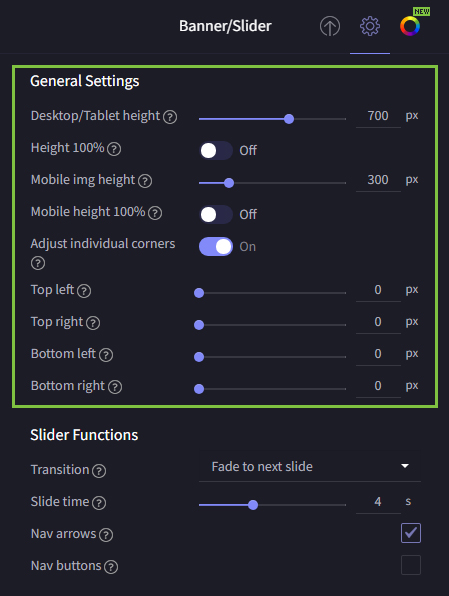
General Settings control both the banner and slider settings.
| Title | The title is for admin purposes only. |
| Desktop/Tablet Height | This is the height each banner will show on a desktop or tablet device. |
| Height 100% | Height pushes the banner to 100% of the height of the desktop or tablet device it is shown on, regardless of the screen size it is viewed on. |
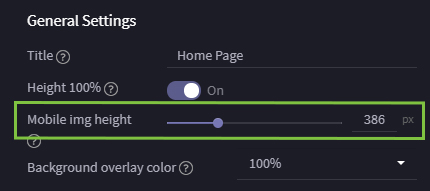
| Mobile img height | This controls the height as it displays on mobile devices. |
| Adjust individual corners | This feature allows you to adjust all 4 corners of your banner individually, allowing for some really interesting and classy-looking banner styles. |
Slider Functions
Slider functions appear under the settings tab of the Banner/Slider. These provide different options for your slider, and will not appear on a single image banner.
| Transition | This is the way the slide changes from slide to slide. Options are:
|
| Slide Time | The amount of time before the slide changes. It is good to test this, based on how much text there is for a user to read in each banner. That should be the defining time point for the slide time. Base this on the reading time it takes for someone who is not familiar with the text. |
| Nav arrows | These appear on the left and right of the slider |
| Nav buttons | These appear on the bottom center of each slide, and will have a button per slide |
Tags: upload image, add image
Styling your banners
Banners can be styled individually for Desktop, Tablet, Mobile by accessing the colour wheel icon at the top of your banner options.
| Label | Description |
|---|---|
| Overlay colour | The colour of the overlay that sits over the image, helping to create creative effects and improve text legibility over busy backgrounds. |
| Overlay transparency | Adjusts the transparency level of the overlay, allowing you to choose between a very transparent overlay or a darker one with minimal transparency. |
| Text background colour | Creates a box behind the text on the image, enhancing text visibility and adding a creative touch to your banners. |
| Text background transparency | Controls whether the text background box is fully solid or has some transparency, allowing the image behind it to be partially visible. |
| Title size and style | Adjusts various properties like font size, letter spacing, etc., to achieve the desired look and feel for the title text. |
| Title colour | Allows you to choose a colour from the site's set colour palette or use a custom one. Using palette colours is recommended for design consistency. |
| Title top spacing | Adds extra spacing above the title to ensure proper padding and separation from other elements, maintaining a consistent layout. |
| Description size and style | Adjusts the font size and properties to suit the description text, similar to the title styles. |
| Description colour | Choose a colour from the site's colour palette or a custom colour for the description text. |
| Description top spacing | Adds extra spacing above the description text for better placement within the text area. |
| Button types | Choose different button types to fit within the banner area. |
| Button size | Select from small, medium, or large button sizes. |
| Button top spacing | Adjust the top spacing of the button from the rest of the text. |
| Hover animation | Choose from various hover animation options for the button. |
| Colour scheme | Select a colour from the website's colour scheme for the button. |
| Hover colour | Choose a different colour for the button when it is hovered over, enhancing interactivity. |
Best Practices for Banners
Creating an effective banner involves more than just choosing an image and adding text. Here are some best practices to ensure your banners are both attractive and functional:
- Use High-Quality Images: Choose images that are high resolution and relevant to your message. Blurry or pixelated images can detract from your site's professionalism.
- Maintain a Consistent Style: Ensure your banners align with the overall design of your website. This includes using consistent colors, fonts, and image styles to create a cohesive look.
- Ensure Mobile Responsiveness: Banners should look great on all devices. Check how your banners display on mobile phones and tablets, and make adjustments as necessary to ensure readability and impact.
- Clear Calls-to-Action (CTAs): Your banner should include a clear and concise CTA. Use action-oriented language to prompt users to take the desired action, such as "Shop Now", "Learn More", or "Contact Us".
- Concise Messaging: Keep your text short and to the point. Banners are meant to grab attention quickly, so avoid long paragraphs. Aim for a headline and a brief description.
- Readable Text: Ensure your text is easy to read. Use a font size and color that stand out against the banner background. Avoid placing text over busy parts of the image.
Common Issues and Troubleshooting
While creating banners, you might encounter some common issues. Here are solutions to help you troubleshoot:
- Text Overlapping with Images: If your text is hard to read because it overlaps with the image, try changing the text alignment or adding a semi-transparent overlay behind the text to improve readability.
- Buttons Not Displaying Correctly: Ensure you have filled out the button text field. If no text is entered, the button will not appear. Also, check the button link to ensure it's correctly configured.
- Banners Not Appearing on the Site: If your banner is not showing up, check the visibility settings to ensure the banner is active. Also, verify that the correct image file is uploaded and that there are no issues with the image file itself.
- Image Quality Issues: If your banner image appears pixelated or blurry, upload a higher resolution image. Ensure the image dimensions fit the banner space correctly to avoid stretching or distortion.
- Alignment Issues: If the text or elements are not aligning as expected, adjust the alignment settings. Consider the layout of the image and avoid placing text over important visual elements.
- Box still showing in my banner - If you have a coloured box showing in your banner even without text, this is due to a 'Text background colour' being set on your banner. Look for 'Text background colour' under the banners styles, and change the transparency to 0% to remove that.
SEO Tips for Banners
Banners can contribute to your website's SEO if optimized correctly. Here are some tips:
- Use Alt Text: Always add descriptive alt text to your banner images. This helps search engines understand the content of the image and improves accessibility for users with visual impairments.
- Optimise File Names: Name your image files descriptively using relevant keywords. Instead of "IMG1234.jpg," use a name like "summer-sale-banner.jpg."
- Strategic Placement: Place your banners in prominent locations where they will catch users' attention but not interfere with the user experience. This can increase engagement and reduce bounce rates, positively impacting SEO.
- Load Time: Limecube automatically optimises banner images and converts them to WebP format, which helps with load times. However, avoid uploading massive image files to ensure your site remains fast and responsive. Even with automatic optimisation, starting with a reasonably sized image file ensures the best performance.
- Content Relevance: Ensure the content of your banner is relevant to the page it's on. Relevant banners can improve user engagement and dwell time, both of which are positive signals for search engines.
By following these best practices and tips, you can create effective, visually appealing banners that enhance your website's user experience and SEO performance.
Can't find the answer you are looking for?
Try using searching below: