PayPal Payment Buttons
On this page:
This page shows you how to create a PayPal button on your site for simple payments. This solution is designed for when you want to receive payments directly from the site, and don't need a full e-commerce solution.
You must have a PayPal business account to use this button.
Setting up your button
Below are the options available when creating a PayPal button.
| Name | Product name appearing on PayPal when checking out. |
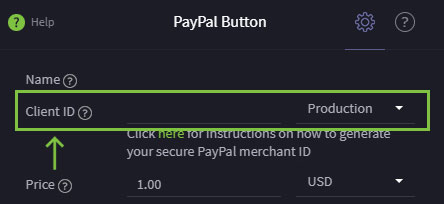
| Client ID | This is an ID generated by PayPal and needs to be entered here.
|
| Price |
|
| Card logos | Turned on this will display credit cards that can be used when checking out on PayPal. |
| Locale | Sets the country you are from. |
| Redirect | Allows you to choose from a page you have created within Limecube. After successful payment on PayPal, users will be returned to this page. |
| Color | Choose from a color for your button |
| Shape | Choose the shape of your button |
| Size | Selects the size of your button:
|
How to generate your secure PayPal merchant ID
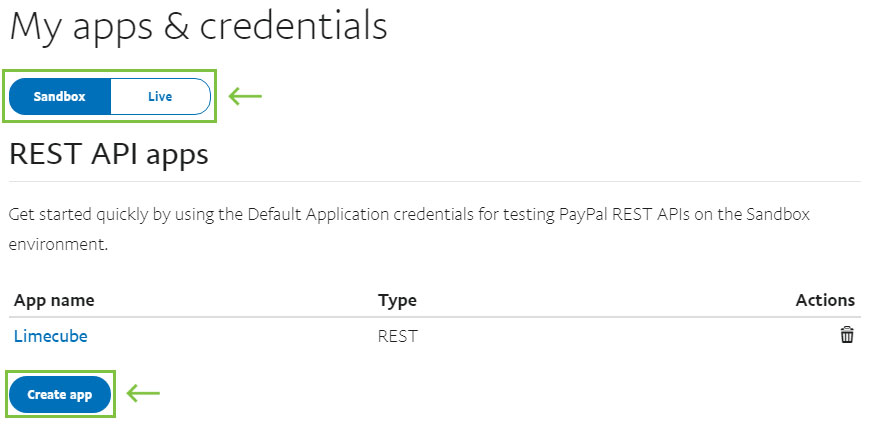
Go to: PayPal Developer Page. Login.
On the 'My Apps & Credentials' tab on the left Scroll down to the 'REST API apps'

- Create an app by clicking Click 'Create App'
- In the App Name, enter a name that is meaningful (it is only visible to you) and
- changing business account email is optional
- then click the Create App button
- At this stage you'll have a new screen that shows your 'SANDBOX API CREDENTIALS'
- Copy that client ID and place into the Client ID field in the PayPal element in Limecube.

- Repeat this same step for both Sandbox and Live as shown in the buttons in the screenshot above
- In your Limecube element settings, on the left of your 'Client ID' click the Sandbox / Live toggle to display and copy the client ID for each environment.
- Product on Limecube = Live on PayPal
These steps you will only need to perform once to get your ID and you don't need to repeat this each time you create a new buttons on Limecube. For any new buttons, simply use these same IDs.
Testing
It is important to test your PayPal payment button before making it live. Follow these steps:
- Open your PayPal button settings.
- Next to the client ID, change the dropdown to 'Sandbox' (test mode) if not already set.
- Test the button by clicking it and following all steps through to returning to your website after payment.
- In sandbox mode, no real payment will be taken.
- Place the button on a hidden page while testing to ensure everything works correctly.
FAQs
Do I need a PayPal business account?
Yes, a PayPal business account is required to use the PayPal payment button.
Can I use this for a shopping cart?
No, this feature is intended for simple payment requirements. For a full e-commerce solution, check Limecube's e-commerce options.
How do I test my PayPal button?
Set the client ID to 'Sandbox' in the PayPal button settings, then place the button on a hidden page and complete a test transaction.
Troubleshooting
My PayPal button isn’t working
Ensure your client ID is set correctly and you have a PayPal business account. Test in 'Sandbox' mode first.
Payments are not being processed.
Verify that the PayPal button is live and not in 'Sandbox' mode. Ensure your PayPal account is properly configured.
The button is not displaying on my site
Check if the button is correctly placed on your page and you are viewing the correct page. If it is still not showing, log a support request.
Can't find the answer you are looking for?
Try using searching below: