
Topic 1
Getting started
What you are looking at#
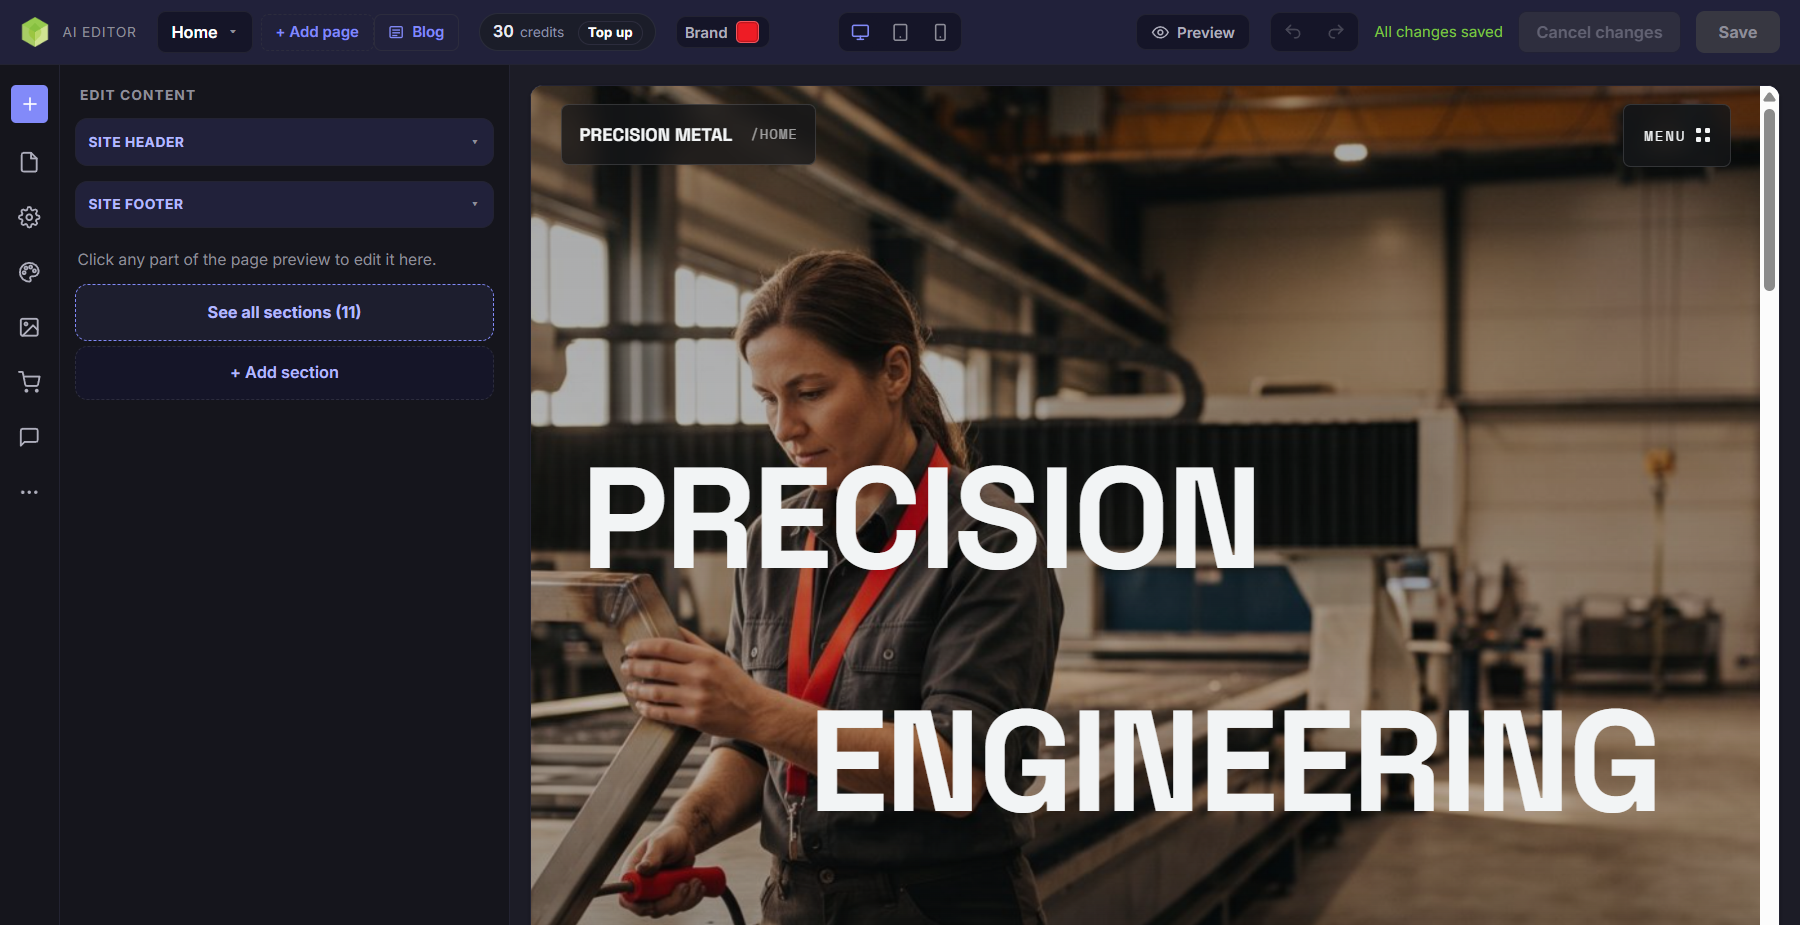
The editor has four parts:
Click any part of your page in the preview and it opens in the panel, ready to edit. That is the main way to get around: see something you want to change, click it.
- The preview fills most of the screen. This is your real page, not a mock-up.
- The panel on the left is where you edit whatever you have selected.
- The icon rail on the far left: Add section, Pages, Page settings, Design, Media, Shop, Feedback and More (the rest of your account; see The More menu below).
- The top bar holds your page name, Add page, Blog, Brand, the device previews, Preview, your credits and Top up, undo and redo, your save status, Cancel changes and Save.
Click any part of your page in the preview and it opens in the panel, ready to edit. That is the main way to get around: see something you want to change, click it.
The top bar, icon rail, editing panel and page preview.
Tips for new users
When you start, small tips appear one at a time next to the thing they describe: how to select a section, the ready-made asks under a section, Save, the assistant, changing theme, undo, checking your site on a phone, and adding sections. Got it dismisses a tip for good; Don't show tips turns them all off. They never appear while the AI is working or a window is open.
Asking the AI for help#
The round button at the bottom right of your page opens Ask AI. It is one box for everything: tell it what to change, or ask how something works. Type, or use the microphone to talk instead. Enter sends; Shift and Enter starts a new line.
Anything that would use credits asks you first, with the most it could cost and your balance: Go ahead or Not now. After a change it tells you what it used, or "No credits used."
- If you ask for a change, it makes it and marks the reply Changed (or Not changed, with the reason and the closest thing it can do).
- If you ask a question ("how do I...", "where is..."), it answers without touching your page, marked Answer.
- If you ask "can I...", it answers and offers to do it.
Anything that would use credits asks you first, with the most it could cost and your balance: Go ahead or Not now. After a change it tells you what it used, or "No credits used."
Things I can do here shows ready-made asks for the whole page: Add an FAQ, Add a contact section, Shorten everything, Warmer tone, Dark mode or Light mode, and Black and white photos. Clicking one fills the box so you can edit it before sending.
It can rewrite your words, change the tone, shorten things, add or remove items in a list, write a stronger heading, improve button text, colour words, give a section your brand colour or a dark background, put a section back to the plain background, try a different layout, change alignment, spacing or heading size, add or remove a section (for example "add a short FAQ near the end"), and, for the whole site, switch to dark mode or make the photos black and white. Whole-site changes are previewed first with Apply to my site or Discard.
If you ask about your logo, business name, menu, header button or footer, it answers straight away and opens the right card, with a pointer to the control you need.
It cannot colour one individual item, add shapes or drawings, set exact sizes, or move things by exact position. If you ask for something it cannot do, it tells you why and suggests the closest thing it can, and your page is left as it was.
It can rewrite your words, change the tone, shorten things, add or remove items in a list, write a stronger heading, improve button text, colour words, give a section your brand colour or a dark background, put a section back to the plain background, try a different layout, change alignment, spacing or heading size, add or remove a section (for example "add a short FAQ near the end"), and, for the whole site, switch to dark mode or make the photos black and white. Whole-site changes are previewed first with Apply to my site or Discard.
If you ask about your logo, business name, menu, header button or footer, it answers straight away and opens the right card, with a pointer to the control you need.
It cannot colour one individual item, add shapes or drawings, set exact sizes, or move things by exact position. If you ask for something it cannot do, it tells you why and suggests the closest thing it can, and your page is left as it was.
Topic 2
Text, images and sections
Editing your words#
Click the part of the page you want to change, then edit the fields in the panel. Your changes appear in the preview as you type. Nothing reaches your live site until you press Save.
Writing more than one paragraph
Longer pieces of writing use a single box. Leave a blank line between paragraphs and they become separate paragraphs on your page. A single new line is a line break inside the same paragraph.
Bold, italics, underline, links, lists and coloured words
Every longer text box has a small formatting bar above it: Bold, Italic, Underline, Add a link, Bulleted list, Numbered list, and two colour buttons, Brand colour and Muted. Select the words you want to change first, then click the button. Each button lights up when your cursor is inside text of that kind, and clicking it again takes the formatting off.
The two colours come from your site's own palette rather than a colour picker, so if you change your brand colour later every word you coloured changes with it. There is no free colour picker, no font choice and no font size for individual words. Fonts and sizes come from your theme, which is what keeps the site looking consistent as you edit.
The two colours come from your site's own palette rather than a colour picker, so if you change your brand colour later every word you coloured changes with it. There is no free colour picker, no font choice and no font size for individual words. Fonts and sizes come from your theme, which is what keeps the site looking consistent as you edit.
Making words stand out in a heading
Headings show your words the way the page draws them, including your theme's accent phrase. Select the words you want to change and a small toolbar appears:
You can also ask the assistant, for example "make the word belief brand coloured".
- The accent button draws them the way your theme draws a highlighted phrase.
- Brand colour or Muted colours them.
- Plain takes the styling off.
You can also ask the assistant, for example "make the word belief brand coloured".
Adding a link inside your text
Select the words, click Add a link, and choose the link type: a web address or one of your own pages (start typing the page name and pick it from the list), an email address, a phone number, or a WhatsApp chat. You can also give the link a title. To remove a link, put your cursor in it and click the link button again.
Sections#
A section is one band of your page: your services, a gallery, your testimonials, and so on. Click a section in the preview and the panel shows just that section. See all sections shows the whole page as a list; Collapse sections takes you back.
Moving a section
Open See all sections, then drag a section by its handle, or use the Up and Down buttons on the section you have selected. The band at the very top of the page (the opener) always stays at the top.
Removing a section
Select the section and click the bin icon. Undo brings it back if you change your mind before you leave the page.
Adding a section
Click Add section on the icon rail, or use the + insert control between sections in See all sections to add one at that exact spot. The add box has two tabs:
Press Escape or click Cancel to close the add box and bring your sections back.
- Write it for me. Pick the type of section and, if you like, say what it should cover, then Generate section. It is written for you using your own content and photos. A written section costs 1 credit.
- From your site. Copy a section you already have elsewhere on your site, words and pictures included, with Insert section. This is free and instant.
Press Escape or click Cancel to close the add box and bring your sections back.
What you can add
Booking, Video, Banner, Features, Services, Gallery, Team, Stats, Testimonials, Pricing, FAQ, Process, About, Timeline, Newsletter signup, Mission and values, CTA (a call to action), Statement band, Structured list, Table, Trust strip, Logos and Contact.
Booking, Video, Contact and Newsletter signup are set up by you rather than written by the AI, so adding them is free.
Booking, Video, Contact and Newsletter signup are set up by you rather than written by the AI, so adding them is free.
Changing how a section looks
Alignment, spacing, heading size and background are changed by asking the AI rather than with switches. Under each section there is an "Ask AI to change this section" box with ready-made asks such as Shorter, Warmer tone, Stronger heading, Add an item, Better button text, Brand colour background, Dark background (or Plain background), and Different layout where your theme has more than one. Clicking one fills the box; press Apply to run it. You can also type things like "centre this section", "make this section more compact" or "make the heading a little bigger".
Changing only the look is free. See Credits for when an ask uses credits.
Changing only the look is free. See Credits for when an ask uses credits.
Banners and the page opener
Banner adds a striking band in your theme's style. A page can have one Banner.
The band at the very top of a page is that page's opener. Every page has one, it always sits at the top, and there is only ever one of them, because your menu sits over it. You edit it by clicking it, like anything else. To change its picture, click it and use Swap image.
The band at the very top of a page is that page's opener. Every page has one, it always sits at the top, and there is only ever one of them, because your menu sits over it. You edit it by clicking it, like anything else. To change its picture, click it and use Swap image.
Sections with a list of items
Services, features, team members, testimonials, FAQs, gallery pictures, pricing tiers, logos and the like are lists of items. In the panel each item is its own box. Use Add item to add one, and the buttons on an item to move it up or down, duplicate it or delete it. Some items have a symbol you can click to change.
Each section has a sensible maximum: 12 gallery pictures, 12 logos or trust-strip entries, 6 testimonials and 8 of most other things. When you reach it, Add item and Duplicate switch off and say so.
Many sections also have an Eyebrow field, the small line of text above the heading. Leave it empty to hide it.
Each section has a sensible maximum: 12 gallery pictures, 12 logos or trust-strip entries, 6 testimonials and 8 of most other things. When you reach it, Add item and Duplicate switch off and say so.
Many sections also have an Eyebrow field, the small line of text above the heading. Leave it empty to hide it.
Tables
A Table section has its own controls: add or delete rows and columns, move them, mark a header row or a first column of labels, make a row bold, set each column's alignment, and add a source or footnote line. Paste a table from a spreadsheet drops in a table you copied from Excel or Google Sheets in one go. A table wider than the page scrolls sideways on phones.
Linking to a section on the same page
Every section has an anchor point, shown as a quiet row in its panel. Copy gives you the link to that section. The pencil lets you rename it (lowercase letters, numbers and hyphens). When you set a button's link, the list of destinations includes "On this page:" followed by each section's anchor, so a button can jump down the page.
Images#
Click an image in the preview to select its section, then use Swap image in the panel. The picker has three tabs:
Right-click an image in the preview and choose Edit image to crop it, adjust it, or remove its background. Removing a background is a Business-plan feature. An edited image is saved as a new copy, so the original is never lost.
Media on the icon rail opens the same library on its own, for tidying folders and uploading ahead of time.
In sections with several items, such as a gallery or your team, each image stays with its own item, so the right photo stays with the right person or project.
- Your Images & Files: everything already on your site, in folders. Upload new pictures with the Upload button or by dragging files in.
- Free Images: a library of free photos. Browse the suggestions or search.
- AI Images: describe the picture you want, choose a style and shape, and it is made for you. AI pictures cost credits (see Credits below).
Right-click an image in the preview and choose Edit image to crop it, adjust it, or remove its background. Removing a background is a Business-plan feature. An edited image is saved as a new copy, so the original is never lost.
Media on the icon rail opens the same library on its own, for tidying folders and uploading ahead of time.
In sections with several items, such as a gallery or your team, each image stays with its own item, so the right photo stays with the right person or project.
Pictures on new pages
When a page is added, or brought across from another site, every picture space your theme shows is filled, so you never get an empty frame or a blank band. Photos already on your site are used first. Then up to three new AI pictures are made for the page, including the opener's picture, only as far as your credits cover. Any space still empty takes another of your site's photos. You can swap any of them afterwards.
Links on buttons and cards#
Buttons and clickable cards have a Link setting with these choices:
Gallery items each have their own Link setting, so every card can point somewhere different.
- A page on this site. Pick it from the list. If you rename that page later, the link keeps working.
- A section on this page. Listed as "On this page:" and the section's anchor.
- Custom URL. Type any web address. Custom web addresses always open in a new tab, so visitors keep your site open. Links to your own pages open in the same tab.
Gallery items each have their own Link setting, so every card can point somewhere different.
Topic 3
Pages and navigation
Your pages#
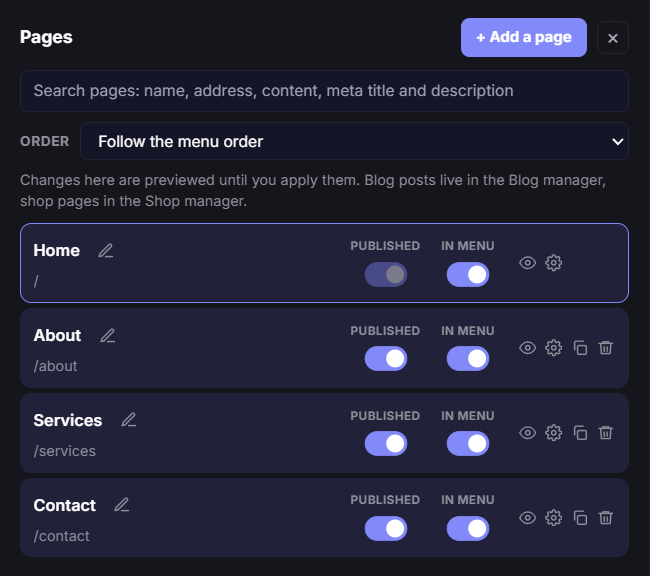
Pages on the icon rail opens the Pages panel: every page on your site, with its address, Published and In menu switches, and buttons to view it, open its settings, duplicate it and delete it. Search finds pages by name, address, content, meta title or meta description. You can also click your page name in the top bar to switch pages quickly.
Each row can show a pill: Draft, Not in menu, Hidden from search, Password, Not applied (a change waiting for Apply to my site) or Unsaved.
Changes in the Pages panel are previewed first. A bar says "Previewing your page changes. Nothing is live until you apply it." with Discard and Apply to my site.
Blog posts live in the Blog manager and shop pages in the Shop manager, not here.
Each row can show a pill: Draft, Not in menu, Hidden from search, Password, Not applied (a change waiting for Apply to my site) or Unsaved.
Changes in the Pages panel are previewed first. A bar says "Previewing your page changes. Nothing is live until you apply it." with Discard and Apply to my site.
Blog posts live in the Blog manager and shop pages in the Shop manager, not here.
Open Pages to rename, duplicate or manage a page.
Changing the order of the list
The Order dropdown sorts the list: Follow the menu order, Alphabetical, Oldest to newest, Newest to oldest, or Published pages first. This only changes how the list is shown to you; it does not change your menu. The editor remembers your choice.
Renaming a page
Click the pencil next to the page name, type the new name and press Enter. The name in the browser tab and in your menu changes with it. If you want the menu to say something different from the page name, change the label in Site header, Navigation.
If the page has unsaved changes, save them first; the pencil says so.
You can also change the name in Page settings, on the Page tab.
If the page has unsaved changes, save them first; the pencil says so.
You can also change the name in Page settings, on the Page tab.
Changing a page's web address
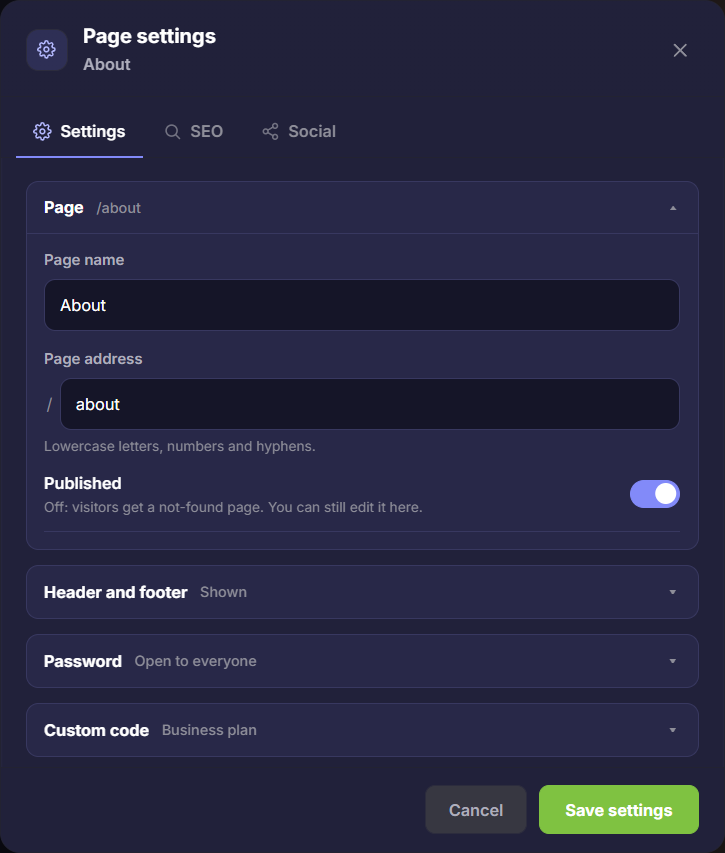
Open Page settings (the gear on the page's row, or Page settings on the icon rail) and edit Page address on the Page tab. Lowercase letters, numbers and hyphens.
On a published page, a switch appears: "Send visitors from /old to /new". It is on by default, and we recommend leaving it on: search engines, bookmarks and links on other websites still use the old address, and this sends those visitors to the new one instead of a not-found page. A page that was never published has nobody using its old address, so there is no switch.
The home page's address is set automatically and cannot be changed. The same goes for the Blog and Shop pages.
On a published page, a switch appears: "Send visitors from /old to /new". It is on by default, and we recommend leaving it on: search engines, bookmarks and links on other websites still use the old address, and this sends those visitors to the new one instead of a not-found page. A page that was never published has nobody using its old address, so there is no switch.
The home page's address is set automatically and cannot be changed. The same goes for the Blog and Shop pages.
Page settings, Page tab: the page name, address and Published switch.
Reordering pages
Drag a page by its handle in the Pages panel, then Apply to my site. The menu follows the same order unless you have arranged the menu separately in Site header, Navigation.
Taking a page offline without deleting it
Switch off Published on the page's row, or in Page settings. Visitors get a not-found page and the page leaves the menu, but you can still open and edit it here. It shows a Draft pill in the list. Switch Published back on when it is ready.
The home page, the Blog page and the Shop page cannot be unpublished.
The home page, the Blog page and the Shop page cannot be unpublished.
Hiding a page from the menu
Switch off In menu on the page's row (or use the eye in Site header, Navigation). The page stays live at its address; it just is not linked from the menu. The list shows Not in menu.
Hiding a page from search engines
Open Page settings, Search engines, and switch on No index. The page is left out of search results and out of your sitemap. The list shows Hidden from search. No follow tells search engines not to follow the links on the page. Canonical URL is only needed when the page is a copy of another page.
Changing what search engines show for a page
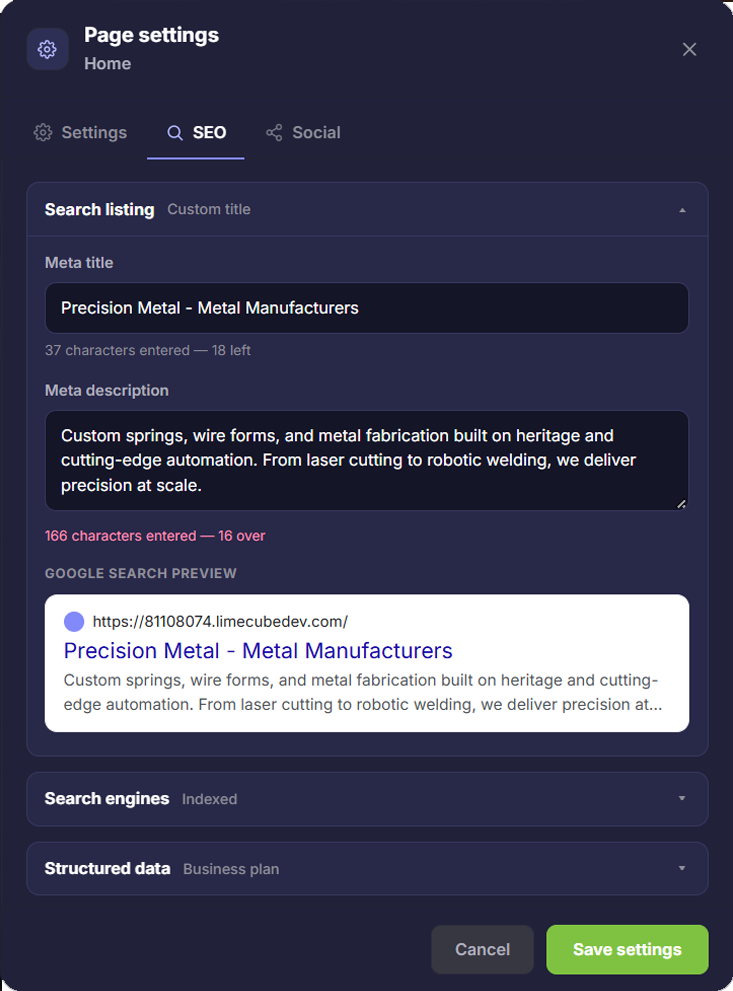
Open Page settings, Search listing, and set the Meta title and Meta description. They default to the page's own title and description, so you only need to fill them in when you want something different.
Page settings holds the search listing (meta title and description), the search-engine controls and structured data.
Structured data
Page settings, Structured data, lets you generate schema markup from the page's own content or paste your own. The script wrapper is added for you.
Password-protecting a page
Page settings, Password. Set a password and visitors have to enter it to see the page. This is a Business-plan feature (also available on the free trial).
Hiding the header or footer on one page
Page settings, Header and footer. Useful for landing pages and the Coming soon page.
Custom code on a page
Page settings, Custom code, takes code for the page head (verification tags and the like) and scripts before the closing body tag. Business plan only.
Deleting a page
Click the bin on the page's row. "Delete this page?" appears inside the row; click Delete to confirm or Cancel to keep it. The home page cannot be deleted, and neither can the Blog page or the Shop page (turn those off in their own managers). You also cannot delete your only page.
Adding a page
- 1Click Add page in the top bar and pick a type: About, Services, Pricing, Contact, Portfolio, Team, FAQ, Coming soon or Blog. A type you already have is greyed out but can still be added again.
- 2Tell us what the page is for. Page name is how it reads in your menu (its address follows it). Under "What should this page say?" type a line or two, or use the microphone to say it.
- 3Or point us at a page: paste the address of a page, for example the matching page on your old website, and click Read it. We read that one page for context only and show the notes we made, which you can trim or correct. Nothing is copied across word for word: the AI writes a new page in your site's voice and design from those notes. The new page keeps that page's address, so old links keep working. If the page has YouTube or Vimeo videos that still play, each one comes across as a Video section.
- 4Click Build the page, or Skip, build from the site brief to have it written from what we already know about your business.
The new page is created as a draft and is not in your menu yet, so you can check it first. When it is ready, open Pages, switch on Published and In menu, and click Apply to my site.
A new page costs 6 credits, plus 2 for each new AI picture made for it (see Pictures on new pages), charged only once the page is saved. Coming soon is free. If the AI could not use your brief, the page is still made as a starting point, it is not charged, and the notice tells you to use Ask AI on the page to apply your brief.
If your plan has a page limit, Add page tells you when you have reached it. A single-page plan cannot add pages.
A new page costs 6 credits, plus 2 for each new AI picture made for it (see Pictures on new pages), charged only once the page is saved. Coming soon is free. If the AI could not use your brief, the page is still made as a starting point, it is not charged, and the notice tells you to use Ask AI on the page to apply your brief.
If your plan has a page limit, Add page tells you when you have reached it. A single-page plan cannot add pages.
Duplicating a page
Click the copy icon on the page's row in the Pages panel. The copy has the same sections, words and pictures, an address such as
about-2, and is created as a draft so it is never live by accident. Rename it and edit it, then switch on Published and In menu when it is ready. The home page, the Blog page, the Shop page and the Coming soon page cannot be copied. Copying is free.Your home page
The first page in the menu is your home page. It cannot be deleted, unpublished or given a different address. To change which page visitors land on, put the content you want on the home page itself.
Your header, menu and footer#
The Site header card at the top of the panel holds everything that appears on every page. Click it to open, then choose:
On phones, the menu button sits in the top right corner on every theme.
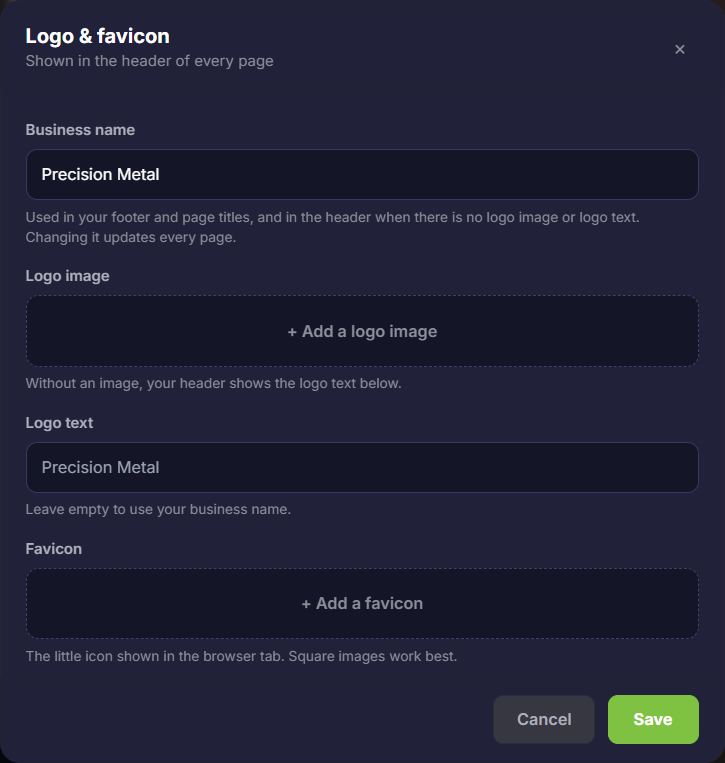
- Logo and favicon. Business name is at the top: it is used in your footer and page titles, and in the header when there is no logo image or logo text, and changing it updates every page. Upload your logo image and choose its size (small, medium, large). Logo text is shown when you have no logo image; leave it empty to use your business name. The favicon is the small icon shown in the browser tab; square images work best.
- Navigation. Drag to reorder your menu, use the eye to hide a page from the menu, and use the arrow to nest a page under the one above it so it becomes a dropdown item. Click a menu label to change the wording shown in the menu without renaming the page; Use the page title again puts it back. Hiding a page from the menu does not take it offline, it simply leaves the menu, and web addresses never change.
- Header button. The wording and destination of the button in your header.
On phones, the menu button sits in the top right corner on every theme.
Site header, Logo and favicon is where you change your business name.
Changing your menu and adding dropdowns
Open Pages on the icon rail and click Manage the menu at the bottom, or open the Site header card and click Navigation. Both open the same place.
Click Save, and the menu updates across every page straight away.
- Reorder: drag a page up or down by its handle.
- Rename a menu item: type a new label next to the page. The page itself keeps its name.
- Make a dropdown: drag a page so it sits just below the one it belongs under, then click the → arrow on its row to nest it. Click the ← arrow to move it back to the top level.
- Hide a page from the menu: switch it off in the list. The page stays published and live at its address.
Click Save, and the menu updates across every page straight away.
Your footer
The Site footer card holds the footer's own words and your social links.
The words show on the page as you type them. Press Save, then Apply to my site to make them live. The rest of the footer, your business name and the menu, is put together for you from your site.
- Footer text. Copyright line replaces the line every theme writes from your business name (leave it empty to keep that). Note under it adds a line beneath, for an ABN, an address or a sign-off.
- Social links: Facebook, Instagram, LinkedIn, YouTube, TikTok, X, Pinterest, Vimeo, Tripadvisor and Weibo. Paste the full address of each profile; icons appear in the footer for the ones you fill in.
The words show on the page as you type them. Press Save, then Apply to my site to make them live. The rest of the footer, your business name and the menu, is put together for you from your site.
A Coming soon page#
Add page, Coming soon, creates a finished page in your theme: your business name over your home page's picture, a line saying the site is on its way, a Get in touch button when you have a contact page, and a sign-up box so people can be told when you are live. It is free, there is one per site, and it lives at /coming-soon.
Creating the page does not switch it on. Turn on the Coming soon setting in Administration, Settings (under More on the icon rail) and visitors arriving at your own domain see the Coming soon page instead of your site. Your temporary Limecube address always shows the full site so you can keep working and share previews. The page is kept out of the menu, out of search engines and out of your sitemap, and its header and footer are hidden. Edit it like any other page.
Creating the page does not switch it on. Turn on the Coming soon setting in Administration, Settings (under More on the icon rail) and visitors arriving at your own domain see the Coming soon page instead of your site. Your temporary Limecube address always shows the full site so you can keep working and share previews. The page is kept out of the menu, out of search engines and out of your sitemap, and its header and footer are hidden. Edit it like any other page.
Topic 4
Colours, fonts and branding
Your brand colour#
Brand in the top bar (or Design on the icon rail) opens the colour panel. It has a Suggested tab, with colours that work with your site, and a Custom tab for picking your own. Your page shows the change before you commit to it. Apply keeps it, Cancel puts it back.
Where your theme supports it, the same panel switches the whole site between a light and a dark look. Generate colour schemes offers complete looks built around your colour, so you can compare them side by side.
The brand colour drives buttons, links and highlights across every page. Text on top of it adjusts automatically so it stays readable.
Where your theme supports it, the same panel switches the whole site between a light and a dark look. Generate colour schemes offers complete looks built around your colour, so you can compare them side by side.
The brand colour drives buttons, links and highlights across every page. Text on top of it adjusts automatically so it stays readable.
Changing your fonts
The Design panel has a Fonts list: the theme's own type first, then a dozen pairings, each shown in its own face. Click one to see the page in it, then Apply, and Apply to my site on the bar that appears. Headings take the first face and everything else the second; your theme's sizes and spacing stay. Free, and it survives a change of theme. Pick Theme's own to go back.
Changing your theme
Design on the icon rail names your current theme. Change theme opens every theme as a card in its own colours and type; click one to see the page you are on in that theme (nothing is saved), then Use this theme to switch every page. Your words, pictures and pages stay, your brand colour is kept, and it is free. Save or cancel any unsaved changes first: the switch works from your saved pages.
Choose a theme to preview it before applying it to your site.
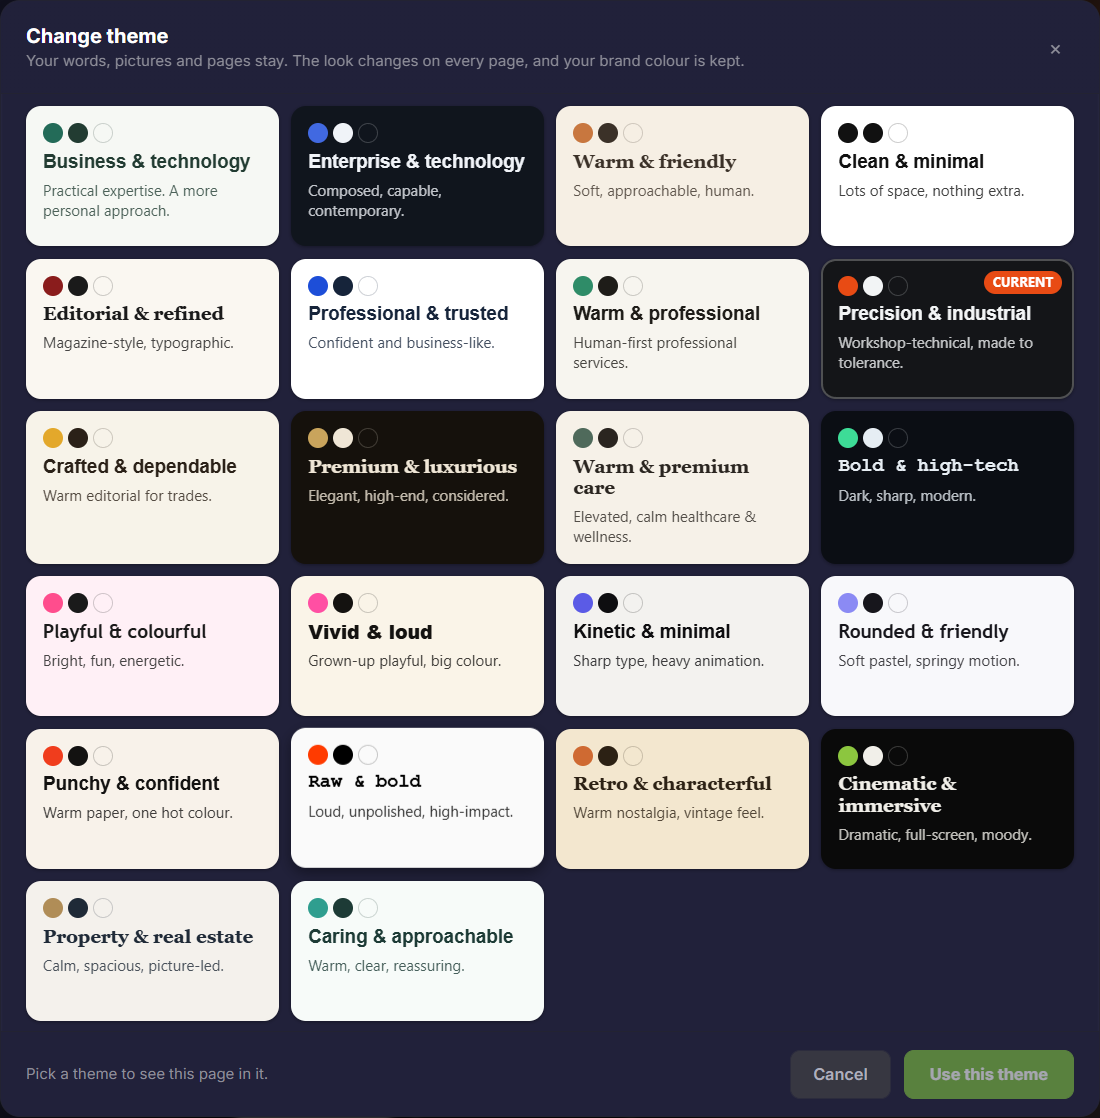
The themes: Technology & AI, Fine dining, Learning & education, Restaurant & dining, Business & technology, Enterprise & technology, Warm & friendly, Clean & minimal, Editorial & refined, Professional & trusted, Warm & professional, Precision & industrial, Crafted & dependable, Premium & luxurious, Warm & premium care, Bold & high-tech, Playful & colourful, Vivid & loud, Kinetic & minimal, Rounded & friendly, Punchy & confident, Raw & bold, Retro & characterful, Cinematic & immersive, Property & real estate, and Caring & approachable.
Topic 5
Blog, bookings and shop
Your blog#
Blog in the top bar opens the Blog manager. If you have no blog yet, it starts one: your first published or scheduled post creates the Blog page.
- Posts. Search, filter by category, and see which posts are drafts, scheduled, published or featured. Click a post to edit it.
- Write a blog post. Write with AI: give it a title or use Suggest headlines, choose a length (short, medium or long), a tone and an optional focus keyword, and it is written in your site's voice and design (6 credits). Or write it yourself (free). Both let you set Category, Author, Publish date and Tags. The post is fully editable after it is created.
- Editing a post. The article editor has the full formatting bar, plus insert video (paste a YouTube or Vimeo link), tables, headings, font size, text colour and an HTML view. Post settings hold the author and byline, publish date, summary and summary image, category, tags, featured, and the post's own search settings.
- Categories and tags. Set them on each post; the blog page's filters use them.
- Listing. Choose how the blog page shows posts: Card grid, List, Magazine or Minimal, in a few sizes.
The publish date, and scheduling a post
Every post has one Publish date, with two choices:
Times are typed straight into the hour and minute boxes, with AM or PM on sites that use a 12-hour clock. Dates and times follow your site's own format and time zone, set in Administration, Settings, Date & Time Settings (Sydney time and a 24-hour clock unless you change them).
In the Blog manager, the Date column shows each post's date, with the time for a scheduled one. Schedule on a draft opens a small window to pick the time; Unschedule takes it off again. Publish now on a scheduled post asks "Publish now with today's date?": it goes live straight away, dated today, and the schedule is dropped. Keep the schedule leaves it as it was.
- Publish now. Pick a date, today or earlier. This is the date readers see once the post is published.
- Schedule. Pick a date and time in the future (it starts at tomorrow, 9am). The post stays a draft and publishes itself at that time, showing that date.
Times are typed straight into the hour and minute boxes, with AM or PM on sites that use a 12-hour clock. Dates and times follow your site's own format and time zone, set in Administration, Settings, Date & Time Settings (Sydney time and a 24-hour clock unless you change them).
In the Blog manager, the Date column shows each post's date, with the time for a scheduled one. Schedule on a draft opens a small window to pick the time; Unschedule takes it off again. Publish now on a scheduled post asks "Publish now with today's date?": it goes live straight away, dated today, and the schedule is dropped. Keep the schedule leaves it as it was.
Taking bookings#
Add a Booking section and choose your booking system: D4W, Eventbrite, HealthEngine, HubSpot Meetings, Mindbody, OpenTable, Quandoo, Setmore, Software of Excellence, The Fork, Timely, or Other.
Paste in the embed code your booking provider gave you. If that code does not look like it came from the provider you chose, we tell you why, rather than leaving a broken booking form on your page.
Paste in the embed code your booking provider gave you. If that code does not look like it came from the provider you chose, we tell you why, rather than leaving a broken booking form on your page.
Adding a shop#
Shop on the icon rail. Add a shop creates your storefront, a Shop page, product pages, cart and checkout, styled to match your site. After that the same icon opens the Shop manager, where you manage products, prices, shipping and payments. The Shop page appears in your menu, and its pages are managed in the Shop manager rather than the Pages panel.
Getting feedback on your site#
Feedback on the icon rail opens your feedback inbox. Create review link makes a link you can send to anyone; no account is needed. They see your site and can pin comments directly onto the pages, and everything they write lands in this panel, grouped by page. Each comment can be marked resolved or reopened, Show this section jumps to the place they meant, and Ask AI to fix puts their comment into the assistant for you to adjust and send. Regenerate link makes a new link and stops the old one working. The number on the icon is your count of open comments.
Topic 6
Saving, credits and account help
Saving, and changing your mind#
The top bar tells you where you stand: All changes saved, Unsaved changes, or Saving.
If you move to another page with unsaved changes, we ask whether you want to save them, leave them behind, or stay where you are.
Some changes are previewed with their own Apply to my site and Discard bar rather than Save: your brand colour and colour scheme, fonts, dark mode, your header, menu and footer, and changes in the Pages panel. Page settings and pages you add are saved as you make them.
- Save publishes your changes to your live site.
- Cancel changes puts the page back to how it was when you last saved.
- Undo and redo step back and forward through recent changes, one page at a time.
If you move to another page with unsaved changes, we ask whether you want to save them, leave them behind, or stay where you are.
Some changes are previewed with their own Apply to my site and Discard bar rather than Save: your brand colour and colour scheme, fonts, dark mode, your header, menu and footer, and changes in the Pages panel. Page settings and pages you add are saved as you make them.
Checking how it looks on a phone#
Use Desktop, Tablet and Mobile in the top bar to see your page at each size. Preview opens your site exactly as a visitor sees it.
Credits#
Some things are made for you by AI and use credits; everything else is included in your plan. Your balance shows in the top bar ("N of M credits"), next to Top up. Hover it for the costs.
The assistant always asks before anything that uses credits, and you are only charged once the work is done. If a finished change would cost more than you have, it is not applied and not charged, and the editor says so. Add page, new written sections and AI blog posts check your balance before they start.
Your plan gives you a monthly allowance, which does not roll over. To protect it, there is also a limit on how many AI actions can run in one hour. If you reach it, the editor says "You are going quickly" and tells you how many minutes until it frees up.
- Free: editing and formatting words by hand, moving, removing, restyling and copying sections, layout and colour changes, adding Booking, Video, Contact and Newsletter sections, swapping images from your files or the free library, editing images, brand colours, fonts, changing theme, dark mode and black-and-white photos, menu, header and footer changes, page settings, and the Coming soon page.
- A new AI picture: 2 credits.
- A new section written for you: 1 credit.
- Asking the AI to rewrite a section's words: 2 credits for each section whose words change, never more than 6 for one ask. Changing only the look is free.
- A new page: 6 credits, plus 2 for each new AI picture made for it.
- A new AI blog post: 6 credits.
The assistant always asks before anything that uses credits, and you are only charged once the work is done. If a finished change would cost more than you have, it is not applied and not charged, and the editor says so. Add page, new written sections and AI blog posts check your balance before they start.
Your plan gives you a monthly allowance, which does not roll over. To protect it, there is also a limit on how many AI actions can run in one hour. If you reach it, the editor says "You are going quickly" and tells you how many minutes until it frees up.
Buying more credits
Top up, next to your balance in the top bar, opens the credits page. Pick a pack, enter your card and pay; the credits are on your site straight away and show in the editor after a refresh. Bought credits keep for a year and are used after your monthly allowance. You need to have confirmed your email address first; until you have, the Pay button is off and says so when you hover it.
Migration credits for bringing a site across are a separate balance (see Bringing your old site across).
Migration credits for bringing a site across are a separate balance (see Bringing your old site across).
Your plan, your domain and support#
Under the section controls in the panel, when no section is selected, the editor shows where your site stands: days left on your trial with a Subscribe button, a Buy a domain button until your site has an address of its own, and your support code. Click the code to copy it; quote it on a support ticket so we know which site you mean.
Confirming your email#
A banner at the top of the editor asks you to confirm your email address until you have. Confirming it lets you connect your own domain and move to a paid plan. Resend sends the link again; check your spam folder if it has not arrived within a few minutes.
Topic 7