Navigation menu
On this page:
The navigation menu typically appears along the top header of your website. In Limecube, this menu structure is mirrored in the left column of the Page Editor, where most editing occurs. This includes all pages, even those not published to the menu.
To make the most out of understanding best practice for creating the bets site navigation for your users, read this blog post on 'A Guide to Crafting User-Friendly Menus on Your Website'.
Menu options:
Menu navigation options
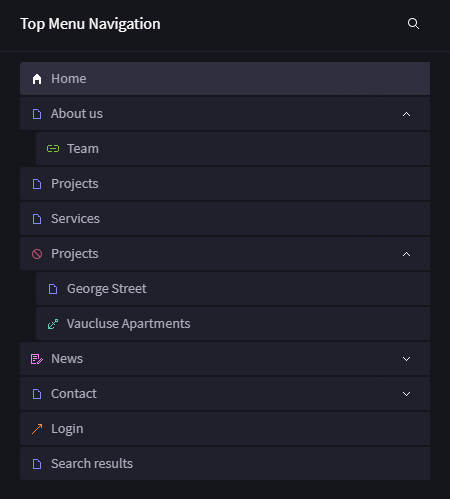
Different sites and different requirements will at times mean you need more than a standard page for your menu. Below we cover what each are for, and how they can be used.
| AI Assisted Page | Let AI design and write your new page. |
| New Page | Create a new page with content. |
| New Blog Post | Create a blog post under the blog section. |
| Internal Link | Link an existing page in multiple menu locations. |
| External Link | Create a link to an external website. |
| Placeholder | Add a menu item with no content, for organizing sub-pages. |
| Page Anchor | Link to a specific section on a page. |
| Blog | Set up your blog. |
| Shop | Set up your shop. |
Here’s an example of a navigation menu using these options:
Working example:
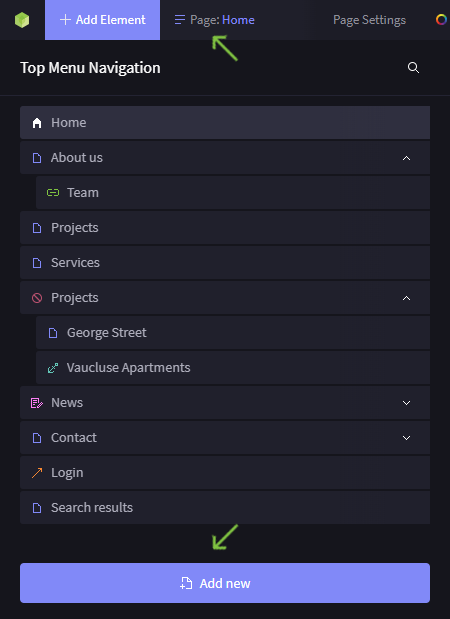
Add new item
- Click the 'Page' option in the top left corner of Limecube to expand the pages menu.
- Click 'Add New' in the bottom left corner.
This will open different options for creating a page or menu item. Each option is covered in detail below.
New page

Selecting "New page" allows you to create a new page with content. After choosing this option, you’ll be presented with various settings to customise your new page.

| Page name |
This is the title of your page. The places it displays are:
|
| Page URL | This is the page url that shows after your domain name, and is often used for SEO purposes. This field auto completes on filling out the page name, however you can still edit it should you wish. |
| Page templates |
Choosing a page template helps you start with an empty page, or with a layout preset to help you set your page up if you are unsure what you will put into it. It doesn't matter of you choose the wrong one, pages are flexible and you can easily add or remove sections you as you need. |
Once you have completed all necessary options, click appy and you can start setting up your page.
New blog post
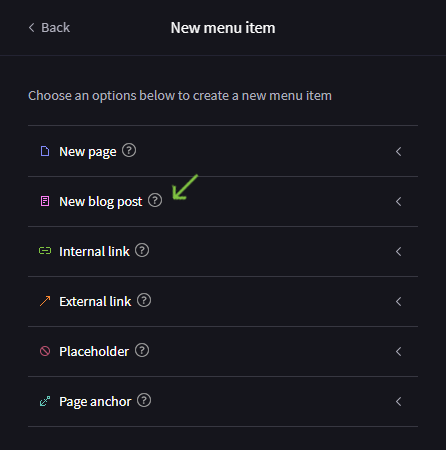
Select "New blog post" when you want to create a new blog post, article, or news item. After choosing this option, you’ll be presented with various settings to customise your new blog post.
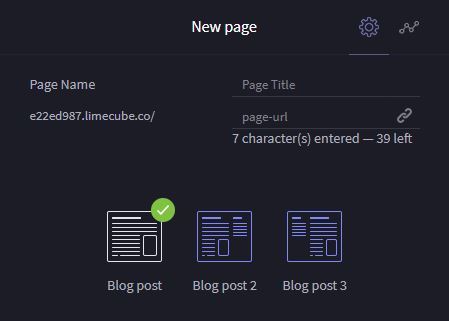
| Page name |
This is the title of your blog post. The places it displays are:
|
| Page URL | This is the post url that shows after your domain name, and is often used for SEO purposes. This field auto completes on filling out the page name, however you can still edit it should you wish. |
| Post templates |
Choosing a post template helps you start with a layout preset to help you set your post up. |
Once you have completed all necessary options, click appy and you can start setting up your post.
Internal link

Select "Internal link" to create a new menu item that links to an existing page on your site. After choosing this option, you’ll be presented with various settings to configure your internal link.
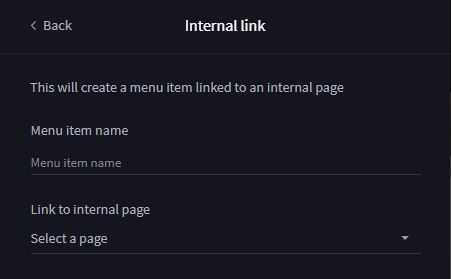
| Menu item name |
The title of your menu item, displayed on the menu (if set to show) and the page sitemap (not XML sitemap). |
| Link to internal page | Select from all the pages within your site to link to. |
Show on Navigation Menu in the header:
Ensure to select 'show on menu' by clicking on the three dots next to the item in the menu. This is not set by default to allow for further setup.
External link

Select "External link" to create a new menu item that links to an external website. After choosing this option, you’ll be presented with the following settings:
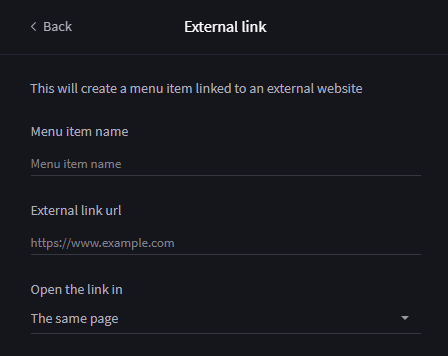
| Menu item name: |
The title of your menu item, displayed on the menu (if set to show). |
| External link URL: | Include the full URL (e.g., https://example.com) to ensure it works correctly. |
| Open the link in: |
While for desktop it is considered better to open an external link in a new tab, on mobile, at this time there is no single recommendation as to which is better, and this is more about your preference. |
Show on Navigation Menu in the header:
Ensure to select 'show on menu' by clicking on the three dots next to the item in the menu. This is not set by default to allow for further setup.
Placeholder
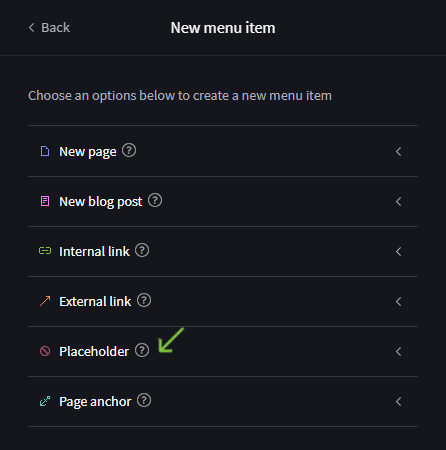
Select "Placeholder" to create a menu item that acts as a point for organizing sub-items, without containing content itself. For example, "Services" could be a placeholder with individual service pages listed underneath.
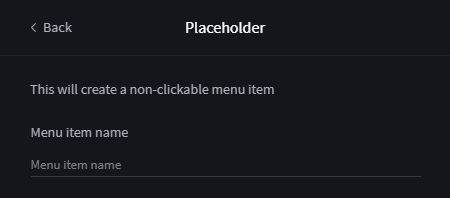
| Menu item name |
The title of your menu item, displayed on the menu (if set to show) and the page sitemap (not XML sitemap). |
Show on Navigation Menu in the header:
Ensure to select 'show on menu' by clicking on the three dots next to the item in the menu. This is not set by default to allow for further setup.
Page anchor
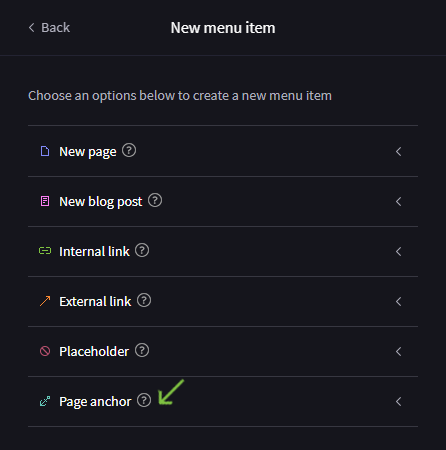
Select "Page Anchor" to create a menu item that links to a specific section of the same page or another page. This is useful for one-page websites with a top menu that navigates to different sections.

| Menu item name |
The title of your menu item, displayed on the menu (if set to show). |
| Link to internal page |
Choose this option if your site has multiple pages. |
| Section inside page |
Select the section you want the menu item to navigate to from a list of available sections. |
Show on Navigation Menu in the header:
Ensure to select 'show on menu' by clicking on the three dots next to the item in the menu. This is not set by default to allow for further setup.
Editing your menu
To edit your menu:
- Click on the Pages menu in the top left corner of Limecube.
- Hover over the page you want to edit and click on the three dots.
- Options available:
- Edit Page: Modify the page content.
- Add New: Create a new page.
- Duplicate: Make a copy of the page.
- Settings: Adjust the page name and URL, and access other tabs like SEO fields and Social Graphs.
- Delete: Remove the page.
- Set as Homepage: Replace your current homepage with this page.
In the Settings tab, you can change the page name and URL. In the SEO fields tab, enter the meta title and description and manage indexing options. The Social Graphs tab lets you set titles, descriptions, and images for social media sharing.
This help video shows how to edit the Limecube navigation menu.

Reordering your header menu navigation
To reorder your menu items:
- Click on the Pages menu.
- Hover over the page you want to move.
- Look for the eight small dots on the left-hand side.
- Hover over the dots, and you'll see a tip for drag and drop.
- Grab the dots and move the page to the desired position.
- To make a sub-page, drag the item slightly to the right under the main page.
It can be a bit tricky, so ensure you get the angle right for sub-pages.
This help video shows you how to change the order of your navigation menu using drag 'n drop.

Making a Page Active
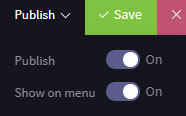
When you first create a page, it will not be active, allowing you to work on it privately.
To make the page active for public viewing:
- Top Admin Bar: Hover over 'Publish' in the top right corner.
- Turn 'Publish' On: Activate the page for public view. If not activated, it will show a 404 error.
To make a page inactive:
- Repeat Steps Above: Hover over 'Publish' and turn it 'Off'. This will result in a 404 error for anyone trying to view the page.
Publishing a page to the navigation menu in the header
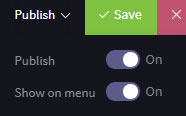
Simply making a page active won't display it in the top navigation menu. Here's how to show a page on the menu:
- Top Admin Bar: Hover over 'Publish' in the top right corner.
- Turn 'Show on Menu' On: Activating this will display the page on the navigation menu. If not activated, the page will function but not appear in the menu.
Publishing a 'Placeholder' menu item
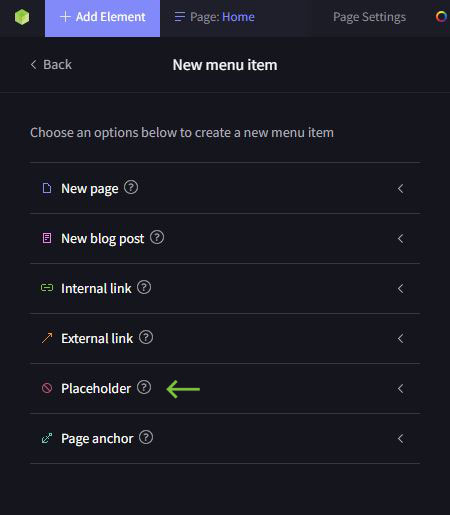
Placeholder menu items don't contain a page, so the process to publish them to the menu is slightly different:
- Hover Over the 3 Dots: On the placeholder menu item.
- Click 'Show on Menu': This will publish your placeholder to the navigation menu.
Tips for Best Practices for Navigation Menus
- Keep it Simple: Use clear, concise labels for menu items.
- Limit Menu Items: Avoid clutter by limiting the number of top-level menu items. Use sub-menus for additional pages.
- Use Descriptive Labels: Make sure menu labels are descriptive and informative, helping users understand where each link will take them.
- Prioritise Important Pages: Place the most important pages in prominent positions (e.g., the beginning or end of the menu).
- Consistent Order: Maintain a consistent order for navigation items across all pages.
Below are 3 examples of clean well structured nav menus:
Corporate Site Navigation Menu
| Home | Services | Case Studies | Resources | About Us | Contact | |||||||
|
|
|
Educational Site Navigation Menu
| Home | Courses | Resources | About | Contact | ||||||
|
|
|
E-commerce Site Navigation Menu
| Home | Shop | About Us | Blog | Contact | |||
|
Troubleshooting
Page Not Showing on Menu
If you cannot see your page in the top navigation menu, make sure 'Show on Menu' is turned on in the 'Publish' settings.
Menu Items Out of Order
Drag and drop the items in the Pages menu to reorder them correctly.
Sub-pages Not Displaying Properly
Ensure sub-pages are indented correctly when dragging them under a main page.
Changes Not Reflecting
Clear your browser cache or refresh the page to see the latest updates.
Can't find the answer you are looking for?
Try using searching below: